


|
 |
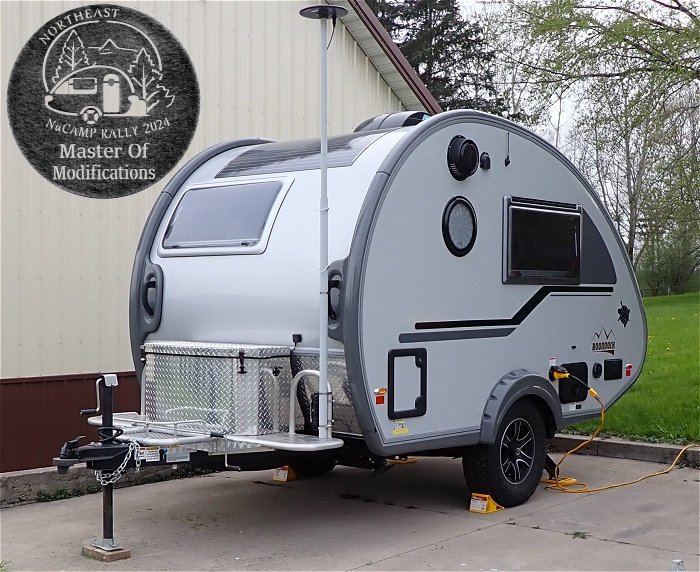
Steve Johnson's T@B Camper Modifications
|
The modifications below are permanent mechanical and electrical changes
I have made.
Also see the T@B accessories we've added.
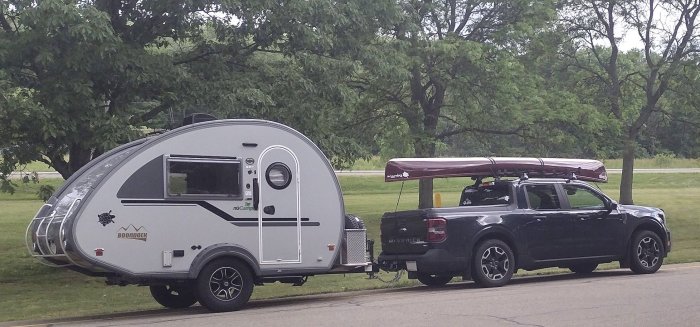
Some of the modifications and additions I have done to our 2021 NuCamp T@B 320S Boondock teardrop camper including:
- Adding a EMS/Surge protector - IMPORTANT
- Installing a Bathroom Fan
- Adding An Outside TV Antenna
- Adding a Backup Camera
- Adding another Lagun Table Bracket
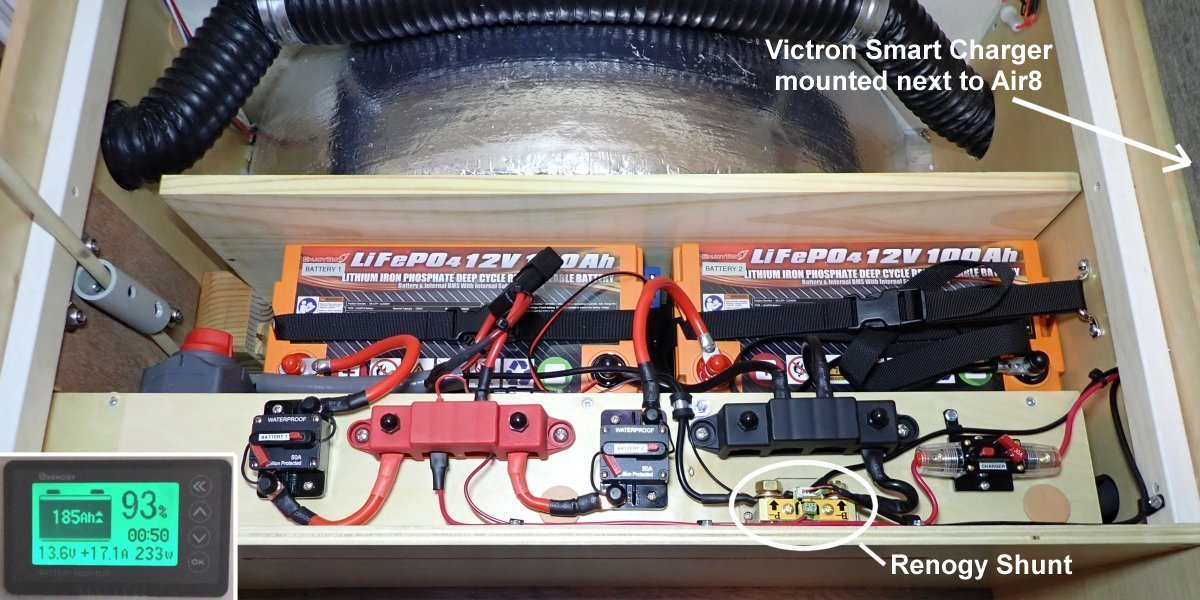
- Moving the T@B Battery Inside
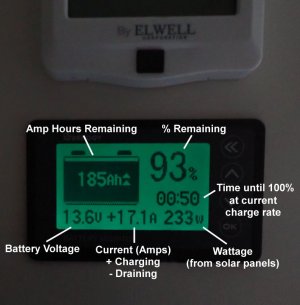
- Switching to Lithium LiFePO4 Batteries
- Adding 200 Watts of Portable Solar Panels
- & more
Note that other T@B models and years may require different modifications and/or equipment.
Don't forget to check out some of the accessories we've added to our T@B teardrop.
|

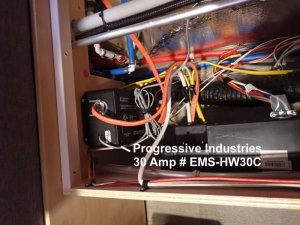
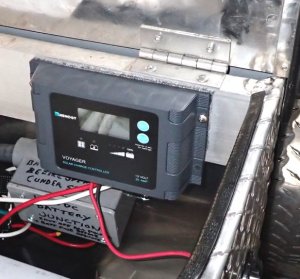
Adding a Surge Protector/EMS (Electric Management System)
Larger Picture
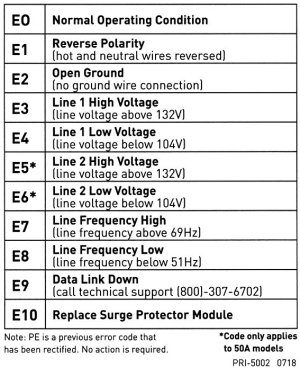
EMS-HW30C Error Codes:
The EMS/Surge I used:
Progressive 30 Amp Hardwired System w/remote display
Other Models:
Progressive 30 Amp Hardwired System no remote display
Portable outside version
(no wiring needed):
Portable EMS/ Surge Protector
|
|
Probably the most important modification you can make to your new T@B or any camper is to add a EMS/Surge protector to your electric/shore AC power input.
Surprisingly, one of the lesser problems you run into at a campground are electrical surges. More damage is done by low voltage and mis-wiring from campground power than power surges from lightening strikes.
Running on low voltage (the most common problem) can damage air conditioners, refrigerators, and other electrical equipment in your camper.
Mis-wired outlets can do immediate damage and a broken or mis-wired ground can actually give your camper a "Hot Skin" where when you touch the camper, you can get electrocuted and die (not kidding).
A quality EMS in line with your AC hook-up will check for these wiring problems and actually shut off the power automatically to protect your family and your equipment (see error codes at left).
When the problem is corrected it will sense it and turn the power back on automatically.
One of the most widely used Surge/EMS systems that gives a lifetime warranty is Progressive Industries. They make both a hardwired version and a portable version you plug into the campground
supply and then plug your camper into it. I chose the hardwired 30 amp EMS so I didn't have to deal with a unit hanging on a post outside where it might disappear.
A hard wired EMS inside the camper will also monitor the connections in your outside cord. It comes with installation instructions and nice big diagrams to show the connections.
I mounted our 30 amp unit under the driver's side bench close to where the AC comes into the T@B. This one has a remote display I mounted behind the television so I can see any error code if there's a problem.
|
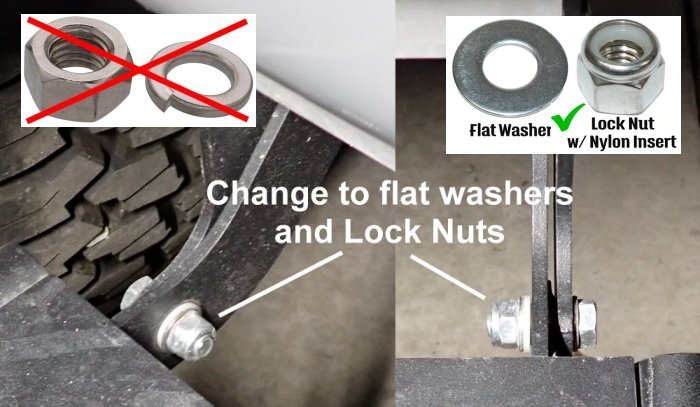
Check your T@B step bolts!
Everyone with a 2021, 2022, or 2023 Boondock step needs to check all your step bolts to make sure they're not loose.
I suggest you replace all of the pivot nuts and lock washers with regular washers with lock nuts as soon as possible. The piviot bolts from the factory with just lock washers and regular nuts loosen,
fall off, and can cause the step to collapse.
 |
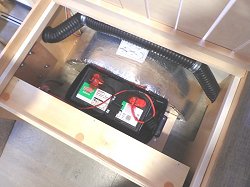
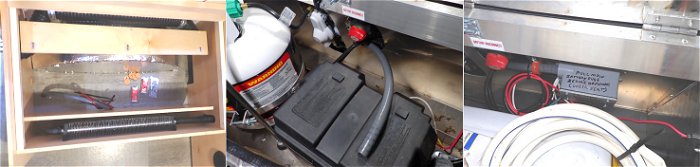
Moving the T@B battery inside
 |
|
Moving the battery location inside lightened the tongue weight and lessened our worries of coming back to base camp at the end of a long paddle or hike and finding the battery missing from the front box.
A new AGM battery (sealed with quicker charging than standard lead acid batteries) was added with a box vented out underneath the camper. Eight gauge wiring was used inside flexible conduit from the new battery location back to the original front box where I installed a junction box to protect the original connections.
A 30 amp fuse was added at the positive battery terminal. Running two heavy gauge wires is much easier that trying to move all the connections to a different battery location. The flexible conduit ran between the floor and bottom cover.
UPDATE:
I have switched from AGM to lithium batteries. See below.
|
|
|
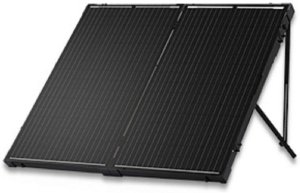
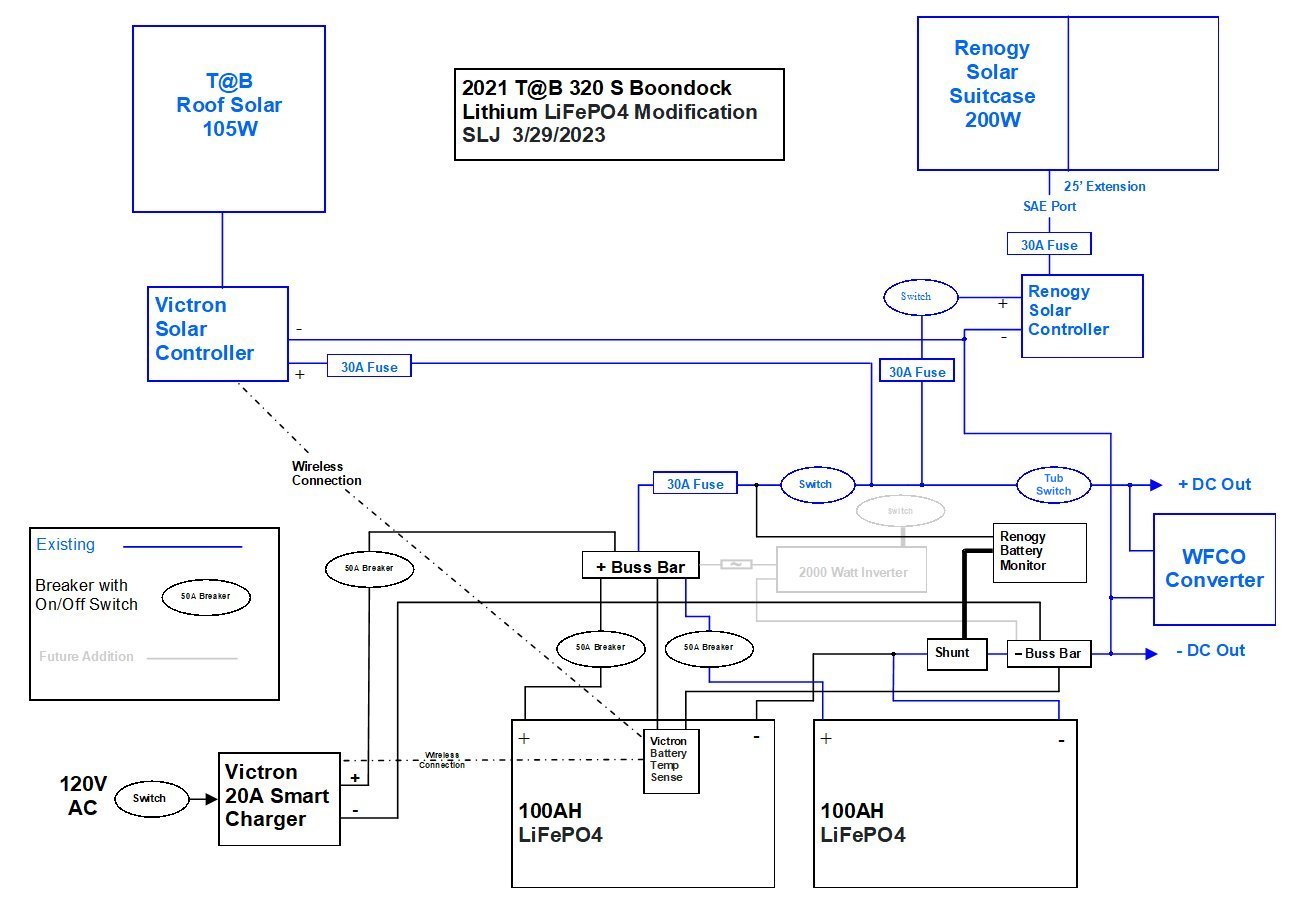
Adding a 200 Watt Portable Solar Panel to our T@B
Added a Renogy 200 watt portable solar suitcase. It connects to the factory SAE connector side of the front tub.
This more than doubles our solar power and being portable, we can set it in the sun when the camper is in the shade and we don't have to orient the tab so it faces the sun.
The controller is on the back of the panels from the manufacturer but I moved it inside the tub so there'd be less power loss with it closer to the battery and not at the end of our solar extension cables.
An adapter is required to plug it into the T@B's SAE port.
Renogy 200 Watt Portable Solar Panel Suitcase
20FT 10AWG Solar Panel Extension Cable
10AWG SAE to Male & Female Solar Adapter
I also purchased this Solar Connector tool kit so I could swap the connectors on the adapter and not have to use a +/- adapter in line. I can replace a connector if one ever breaks:
Solar Connector Tool Kit
|
 |
|
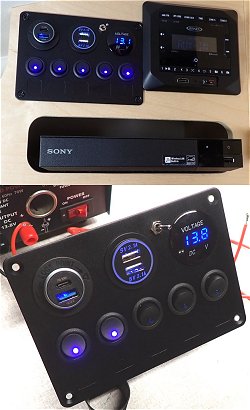
Adding A T@B Switch Panel
For those of us that frequently camp in remote places, conserving battery power is a must. Even though it's a "Boondock" model with solar battery charging, it came from the factory with way to many things constantly drawing battery power even when off and lights that were always glowing at night.
I added a switch panel by the radio (very tight fit) with additional 12V and newer type USB C ports, and a voltmeter to keep an eye on the battery voltage.
The switches cut power to all the inside USB ports, the outside USB port I added, the Stereo/Radio (also glows at night), the Blue-Ray player I added, and the Television.
Most were parasitic draws on the battery even when off.
There are lots of options with marine panels as they can be configured with may different types of switches, meters, and charging ports. Here is a link to the switch panel I used:
Marine Toggle Rocker Switch Panel
|
|
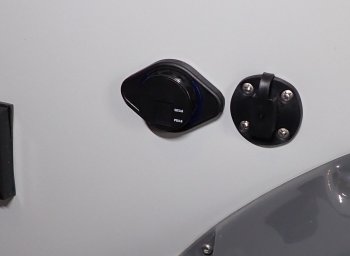
| Outside Waterproof USB Port
Easy install as this one is surface mount and all you need is a small 1/8th inch hole for the wires.
I ran mine to my switch panel by the Jensen Stereo (see switch panel addition above) so it can be switched off when not used. I also added a 10 amp in-line fuse inside behind the outlet.
Now when we're sitting outside we can charge our phones, recharge our Bluetooth speaker, or run outside USB light strings when at music festivals and antique shows (no outside lights when camping).
Also added an additional SAE 12 volt port to the right of the USB port for powering coolers or whatever since the SAE port on the side of the front tub is for my solar suitcase.
Waterproof USB Port
|
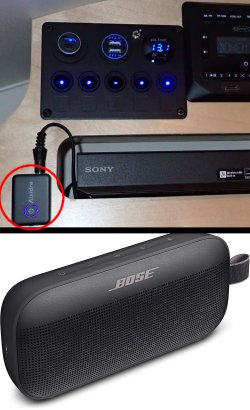
Adding Bluetooth
to our T@B
 |
|
Lets face it, the built in Jensen stereo speakers in the T@B suck. They only sound acceptable at really low volume.
The TV is about the same. It's a tight space and I really didn't find much I could replace them with.
I added an Aisidra Bluetooth transmitter to the Line Out of the Jensen stereo and got a Bose SoundLink Flex Bluetooth Portable Speaker (waterproof) which sounds great. Being Bluetooth, the
Bose speaker works inside and outside the T@B and has at least a 30-40 foot range outside the T@B... and before you freak out about playing music outside, we use our T@B for antique shows and music festivals also. There's
many times we like to sit outside and listen to our music library on a USB drive stuck in the Jensen stereo.
I thought there might be an issue with audio sync with the TV sound but I was happy to find the Aisidra Bluetooth Transmitter does not have any noticeable sound lag.
Both the Bluetooth transmitter and speaker last several hours on a single charge and recharge and play while charging using our USB ports.
Now we can listen to good high fidelity sound from the TV playing through the stereo and have our music inside and outside with no wires to mess with.
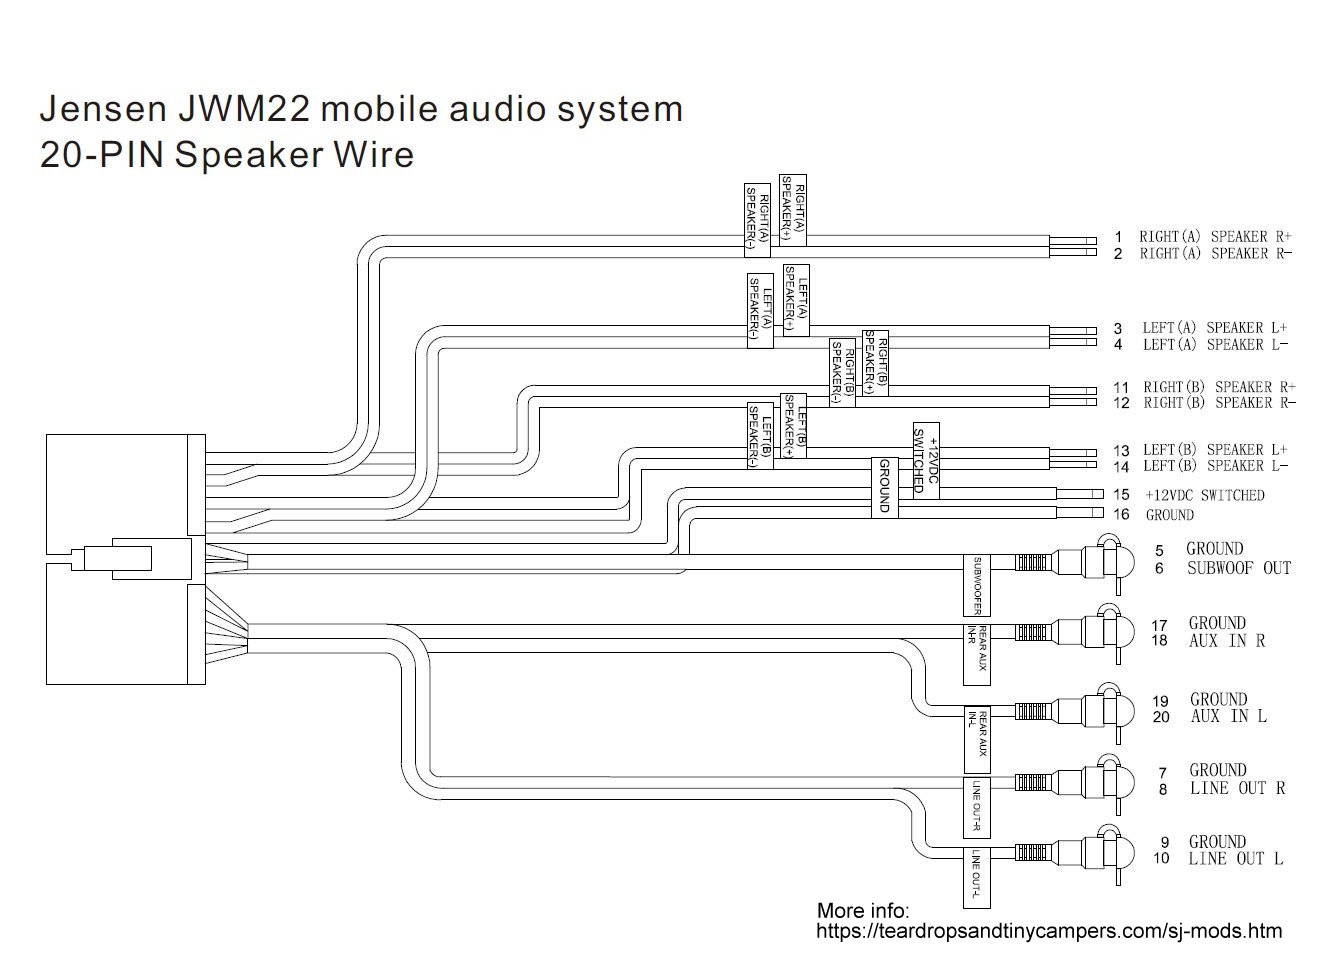
Install Notes: The Bluetooth transmitter is plugged into the Line Out of the Jenson which is also mirrored to the Zone A speakers.
Jensen JWM22 Wiring Harness Schematic
You will need to reconnect the T@B speakers to Zone B on the Jensen stereo so you can shut off the T@B speakers so you don't hear both them and the Bluetooth speaker out of sync at the same time.
The Bluetooth transmitter is attached with velcro so I can just pop it off and use it elsewhere when I want.
Aisidra Bluetooth Transmitter
Bose SoundLink Flex Bluetooth Speaker
|
 |
|
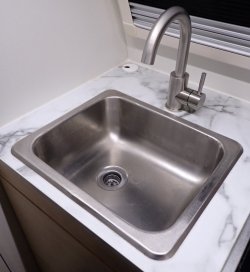
Replacing the T@B's Kitchen Faucet
One of the things that really needed to be replaced was the cheap, plastic, to low to the sink faucet. It was terrible.
Fortunately it is an easy and pretty cheap fix. Our T@B takes a standard single hole, bar faucet.
I replaced the original faucet with a higher swivel faucet in about twenty minutes using two wrenches.
Here's the faucet we used:
RODDEX Stainless Steel Wet Bar Sink Faucet |
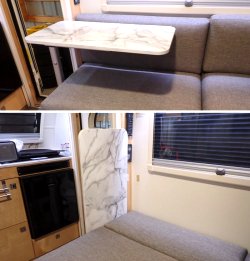
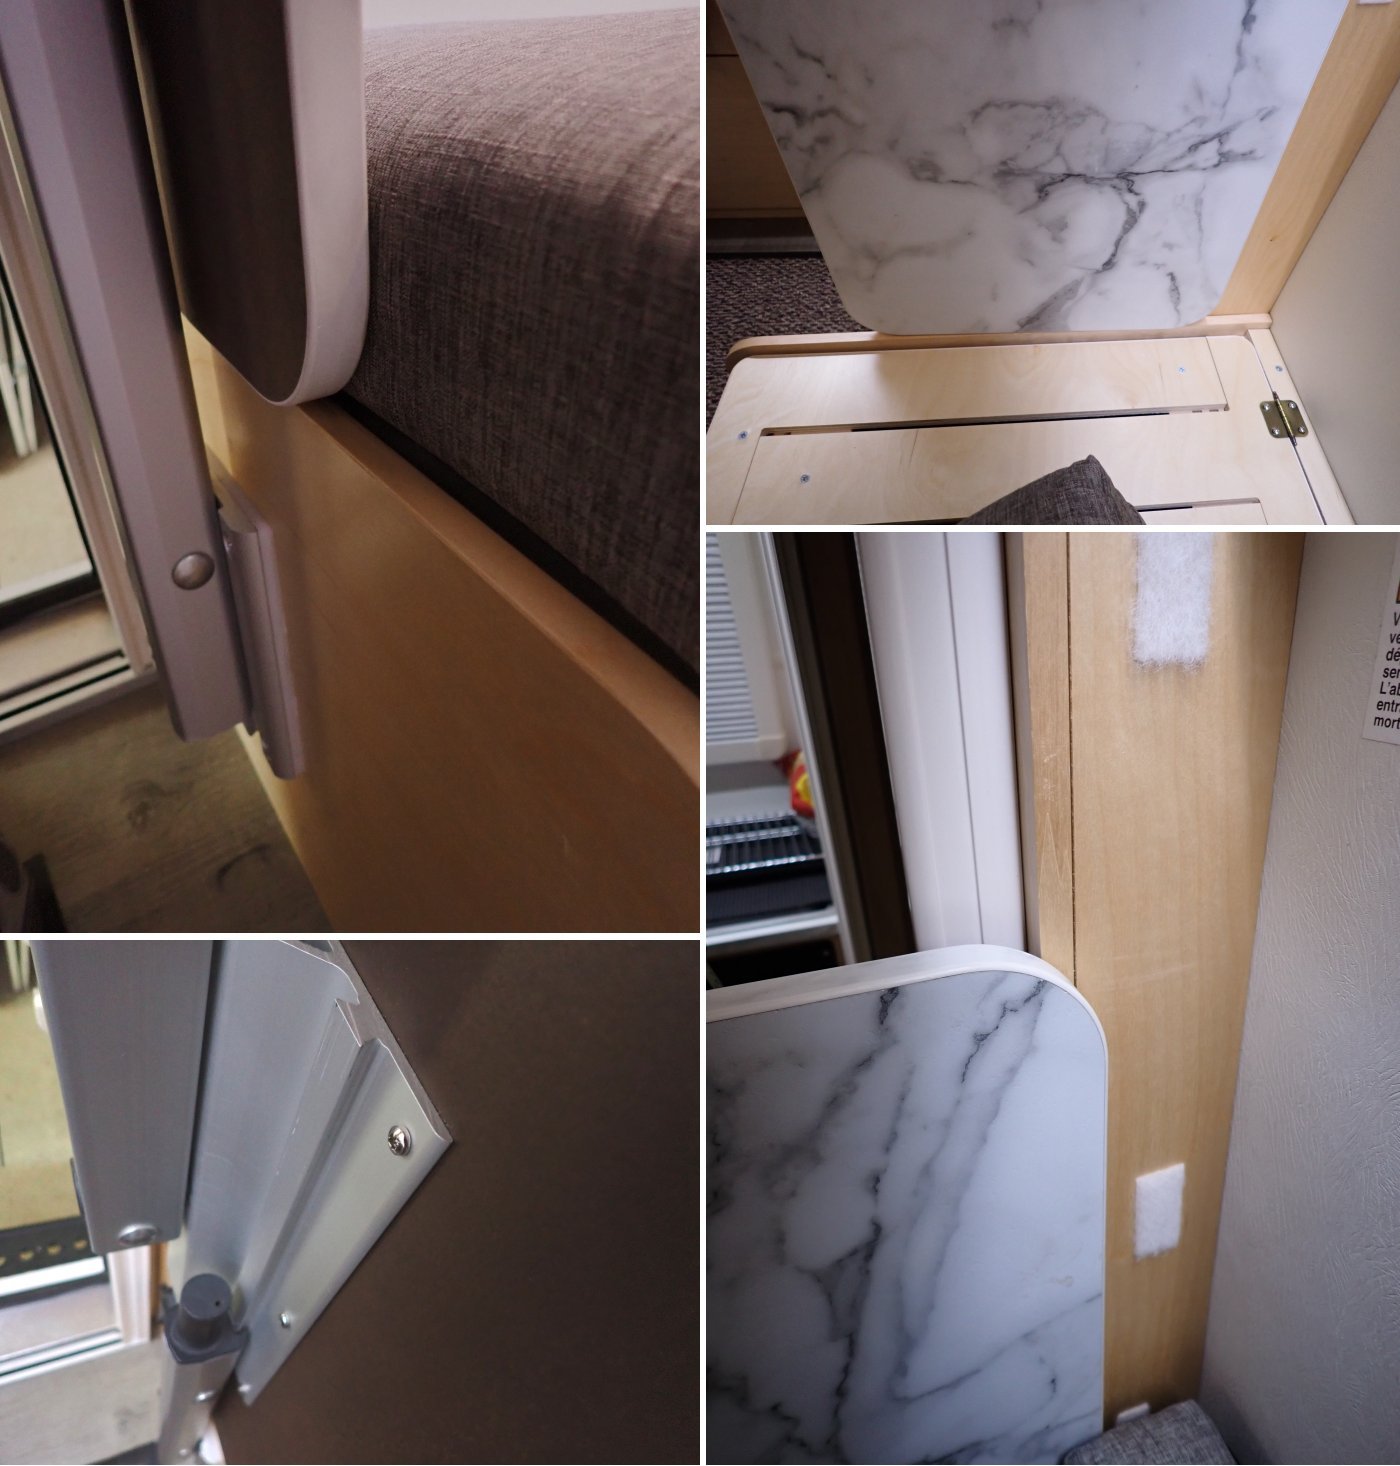
Adding another
T@B Lagun Table Bracket
by the door
 |
|
Adding another Lagun table bracket by the door gives you a table you can use for more counter space.
A place to set things during the day you can easily reach from outside the door.
At night it gives you a headboard so your pillow won't fall off for those like me that sleep front to back (slides right into the bracket on end).
The big plus is you have somewhere not in the way to easily store the table at night!
Hint: When placing the new bracket, make sure the upright table sits on the edge of the bench and overlaps the door frame slightly for additional support at night. (pictures)
Bracket sold here: Lagun Bracket w/ Hardware
|
 |
|
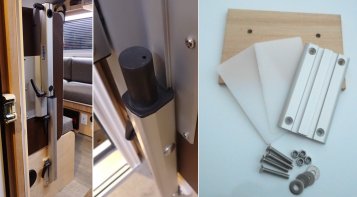
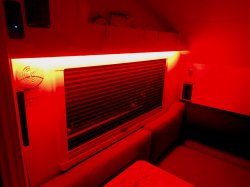
Red light helps maintain your night vision.
I installed a red LED strip with a switch by the door so I can navigate around the T@B when I'm using the Telescope at star parties and when camping in Astronomy campgrounds without screwing up my night vision.
The strip was glued up next to the existing white LED strip.
The outside light was also changed to red by just using gel paper over the existing lens. Red also helps keep the bugs away... and yes, I've heard all the "Roxanne" jokes.
Where to get it:
Red LED Flexible Strip Ribbon Light
Outside Light: Gel Lighting Filter - Red
|
 |
|
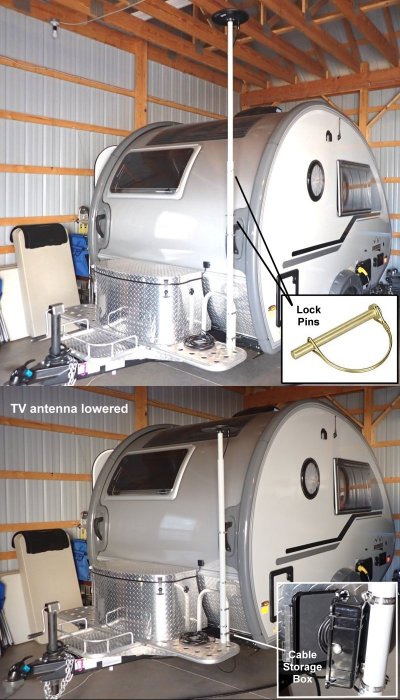
Adding An Outside T@B TV Antenna.
No holes in the roof!
We also use our T@B for antique shows and music festivals. It comes with a TV but doesn't come with a TV antenna. They expect you will stream everything.
For us, over the air local TV stations are nice to have.
I didn't want to drill holes in the roof and when traveling, setting up a TV antenna when you're at a rest stop or parking lot is a no no.
The solution for us was a KING OmniGo antenna permanently mounted on a telescoping mast that works in the raised or lowered position.
I used 1¼" and 1" PVC electrical conduit to make a telescoping mast fixed to the camper in three places (Platform rail and T@B handle) using stainless hose clamps. The mast is held at height using two locking pins.
It's held in the upper or lower position using two standard locking pins you can get at most hardware stores. I added a small storage box to coil the excess cable in when it's in the lower position.
I used two shorter Allen head screws for mounting the king on the top of the pole by drilling two holes in the PVC and used Loctite on the threads.
The cable is run down inside the mast and run back under the T@B along the frame and into the Nautilus compartment where it's plugged into the cable TV connection.
The amp is in-line at the back of the TV and picks up it's 12 volt power from there where I installed a 12 volt plug. It's switched off with the TV so it isn't a constant drain on the battery.
KING OA1501 OmniGo Portable HDTV Antenna
|
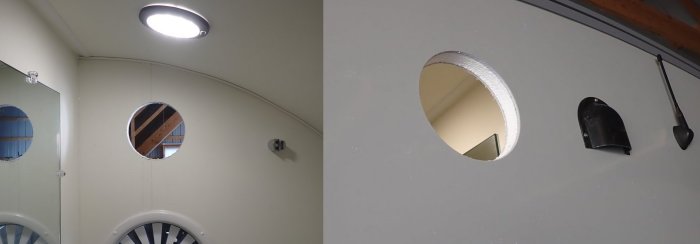
Installing A Bathroom Fan in our 2021 T@B 320 S Boondock
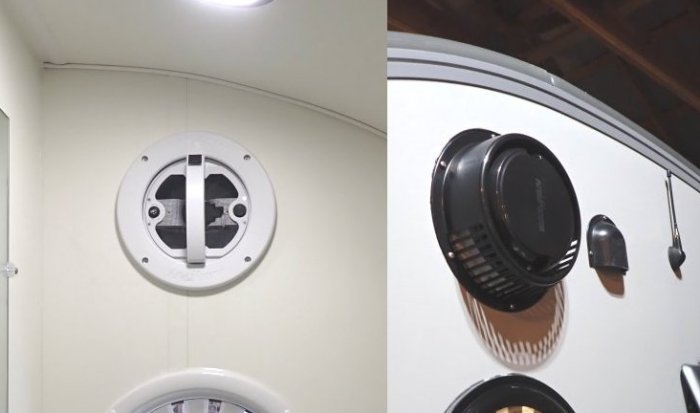
How I added a Bathroom Fan in our T@B 320 S Boondock.
Cutting a six inch (actually a 6 ¼ inch) hole in the side of your new camper for a bathroom fan is not for the weak of heart. Why NuCamp doesn't put one in at the factory is beyond me.
I first got out the handy dandy electronic stud finder to see if there were studs or wiring in the location I wanted the fan which was directly above the bathroom window and even with the outside vent.
I then took a picture with the proposed fan location marked and sent it to NuCamp and asked if that location was clear to drill.
The answer was yes! Remember we're talking 2021 T@B 320S Boondock. Yours me be different.
I then got a 6 ¼ inch hole saw (see below) and did the deed. The hole came out perfect... (big sigh of relief)
The 12 Volt DC wiring was run inside the Azdel wall from the existing radio antenna cut behind the microwave over to the new fan hole using a large gauge solid copper ground wire to punch the channel inside the wall.
Again holding my breath hoping I didn't hit anything.
It took some cursing and sweat to get it through.
Important! Do not remove the large wire until you've attached wire for the fan power to the fan hole end of the large wire and used it to pull the power wire back through using the wire you made the channel with.
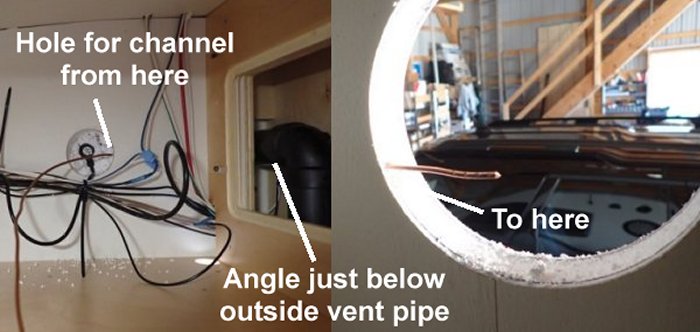
Then I ran the wiring down from the back of the microwave, inside the inner bathroom wall to under the bench where I found a spare 12 volt source.
Installing the MaxAir dome fan (see link below) was pretty easy. They give you a sleeve to insert into thicker walls. I installed the fan from the outside with the sleeve attached on the inside to keep it centered in the hole.
Using a bead of Dicor non-leveling sealant all around the edge (see below) of the fan assembly, I then used the screws supplied to attach the fan to the outer wall wiping off any excess sealant and attached the wires inside and tested the fan.
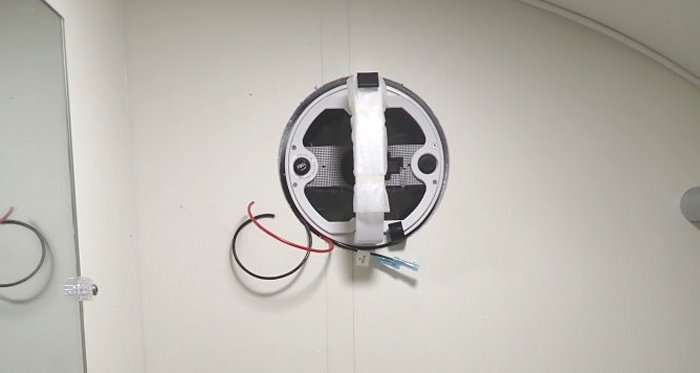
Next step was to insert the plastic sleeve again and mark it at the wall line. I cut it on the table saw, re-inserted it and carefully used the four white screws supplied
to install the inner fan ring being careful not to over tighten the screws in the Adzul wall. Once everything was in place, tested, and working, I installed the outside dome
cover again (open grate down) using the supplied screws and Dicor non-leveling sealant all around the edge while leaving a small space on the bottom of the cover for water to drain.
We now have a bathroom fan to get rid of smells and to draw moisture out after using the shower.
|
|
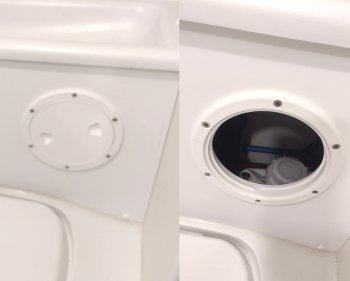
| Installing a 6 inch hatch
for accessing the Glycol tank
To check or add Glycol to the Alde furnace I had to remove wood screws on a panel behind the toilet each time. Putting in a hatch to access the tank was pretty easy. Used the same 6¼" hole saw I used to cut the hole for the bathroom fan.
6" Hatch
|
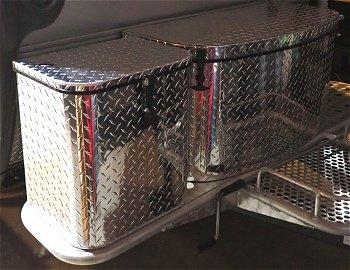
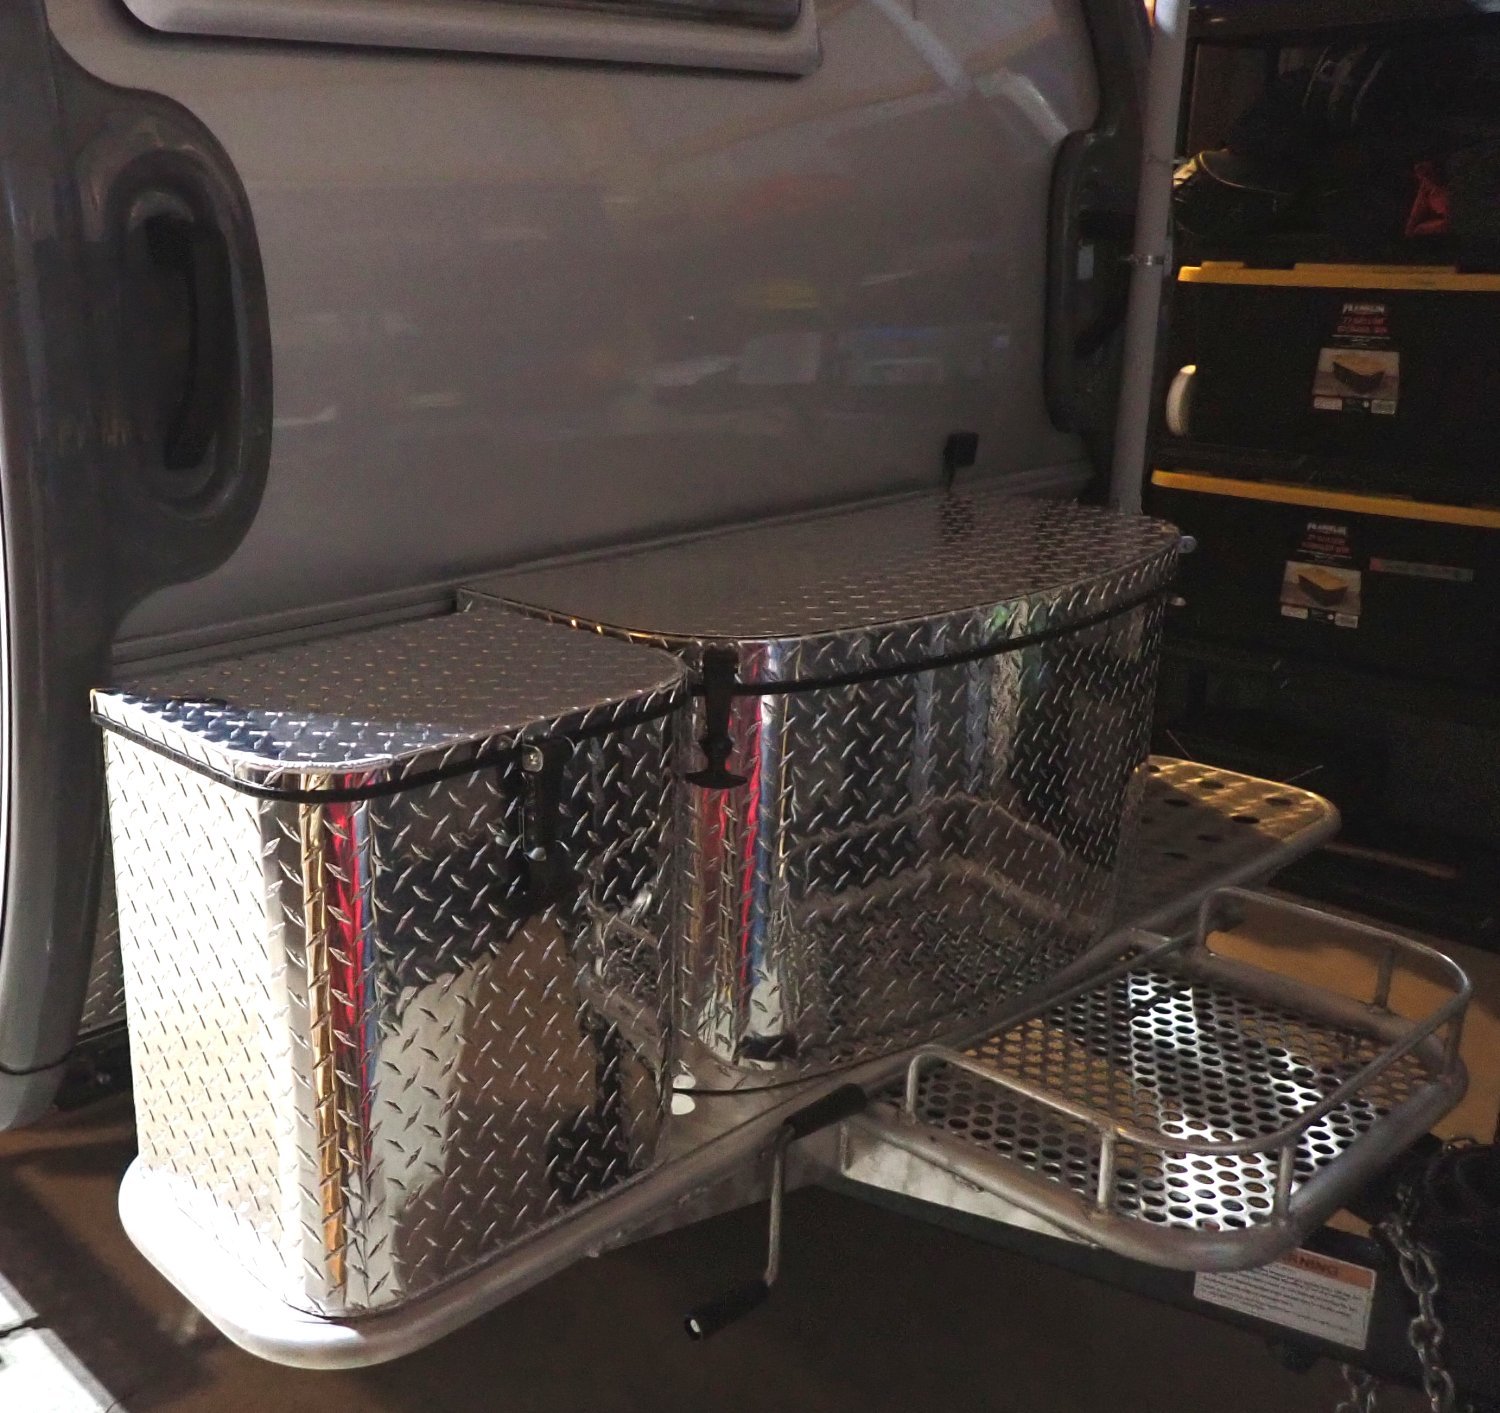
Additional Front Storage Bin
|
|
These storage bins from Sea Biscuit Metal Designs are a perfect match for the center factory bin on T@B teardrops.
I added one to the T@B's front platform to store all my wheel chocks, levelers, tent stakes, etc. I use for set-up. You can add a second one to the other side for even more storage.
It came with all the hardware to attach it. I also drilled three ¼ weep holes to the bottom corners and front for drainage.
Larger Photo
Sea Biscuit Metal Designs
|
|
|
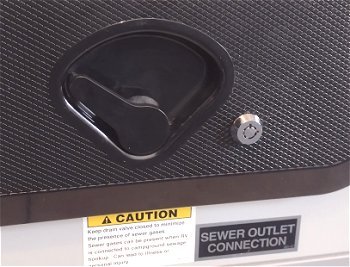
A Lock for the Nautilus compartment
Added a lock to my 2021 nautilus compartment to prevent someone from messing with the water connections when it's sitting by itself when I'm boondocking.
Newer T@Bs have one from the factory. The sewer outlet sticker right below the lock should help also.
It took a bit of drilling and cutting of a slot in the plastic door frame.
Tubular Cam Lock
|
|
|
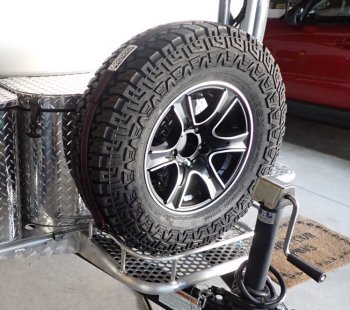
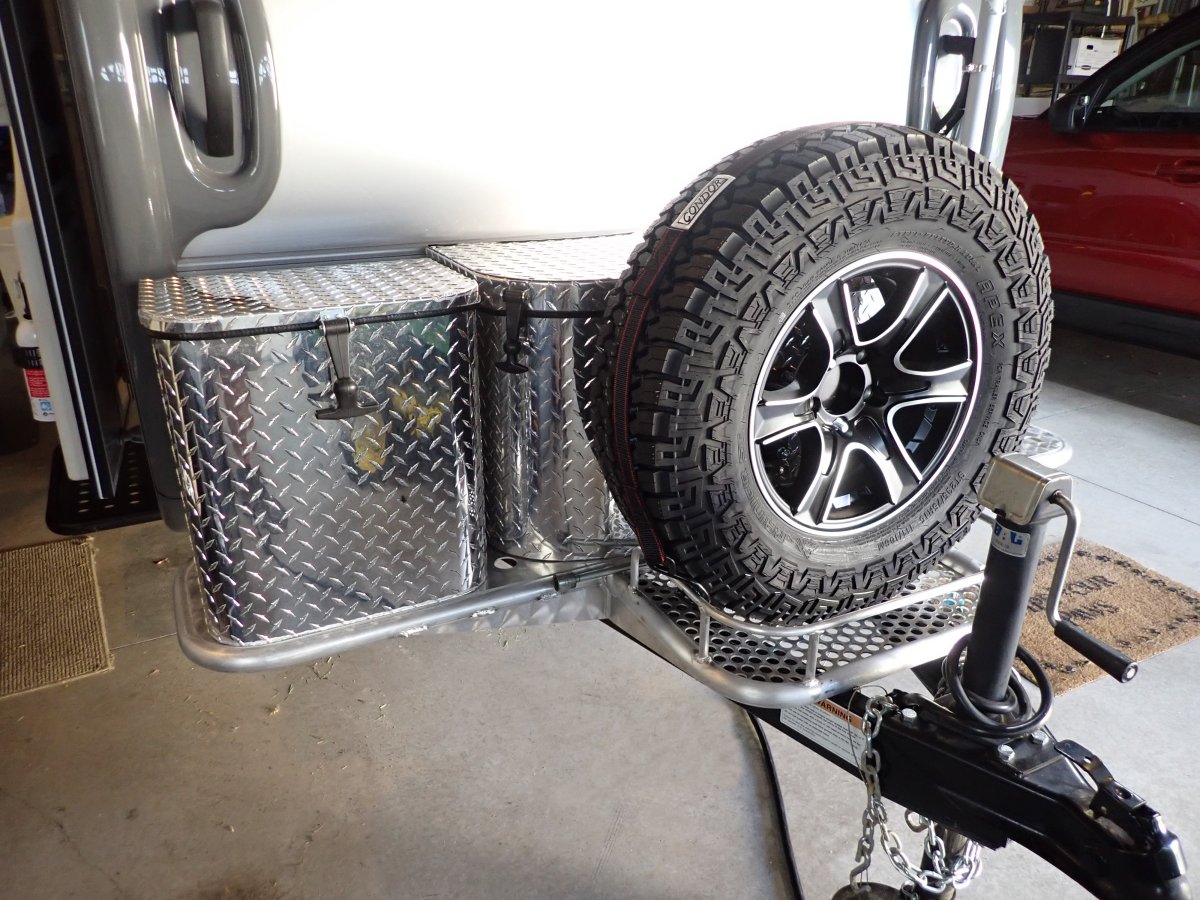
Matching Spare Tire
(and now easy to get to)
Wasn't a fan of the regular trailer spare tire that didn't match the wheels on my 2021 T@B 230S Boondock. And I wasn't a fan of it being on a cable under the tongue below the frame reducing my ground clearance.
Found a matching Wheel/Tire combination and mounted a Spare Tire Mount from Harbor Freight with a back plate on the front tub. Tire weight rests on the front platform tight to the railings.
For good measure I ran a heavy duty rachet strap around it to reduce any bouncing (picture).
Rainier Apex Tire on Thoroughbred Aluminum Wheel
|
| |
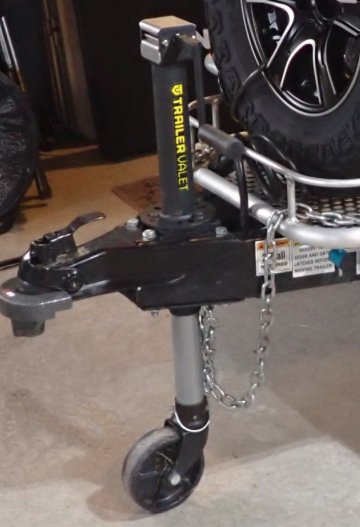
Installing a new Jack
The original front jack on my T@B worked fine with my SUV as it was far enough back to allow the rear hatch to open.
I switched to a small pick-up over the Winter and the TAB's forward facing jack handle would block the tailgate from being lowered when the T@B was hitched to the pick-up.
The solution was to find a jack that could be installed with the crank handle on the side, not the front. I found the Trailer Valet Center Mount Tongue Jack that
could be mounted at a 90 degree angle so the jack handle would not be in the way of the tailgate when lowered. As a plus, the jack handle can be quickly removed (no tools required)
and an included adapter slides on the jack to allow the use of a power drill to raise and lower the jack if you wish. It's available in a 2,000 and 5,000 pound version. Both are the same dimensions. I chose the 5K jack as it looked like the top could be removed for lubrication.
I did run into two unexpected install problems. The jack hole on the lower tongue plate needed to be enlarged slightly to allow the jack post to fit through it.
Quick fix with a drill and small grinding wheel and a shot of paint to keep the ground edge from rusting.
The second problem requires an additional part and a longer description here.
|
Installing a Garmin Backup Camera on the T@B
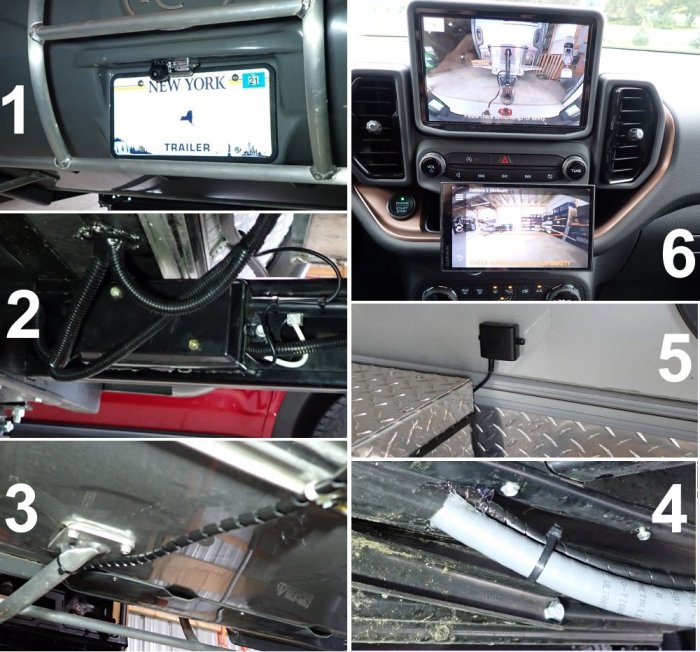
I tried installing a wireless backup camera on our T@B and ran into a problem.
The roof is metal and blocks a lot of signal. My solution was to install a Garmin BC-30 Backup camera that has an extension to mount the antenna on the front of the T@B.
I wanted a Garmin camera so I didn't have to deal with another screen. The Garmin camera displays on my existing Garmin RV-780 GPS.
The install was pretty easy as the camera screwed in above the rear license plate (1), I ran the wire inside the plastic lower cover.
From there I went above the rear stabilizer (3) wraping the wire with spiral wrap for protection,
and inside the lower cover under the floor all the way up front (4) and mounted the transmitter on the front wall (5) using the supplied double sided tape. I grabbed running light power in the front tongue power box (2) on the frame to power the camera.
I like the voice controlled GPSs. All I have to do is say "Show Video" and the back up camera is displayed.
If using a Garmin camera, make sure the camera you choose is compatible with your model Garmin GPS.
What I used:
Garmin BC 30 Wireless Backup Camera
Garmin Wireless Backup Camera Extention
Garmin DriveSmart 65 GPS
or
Garmin RV 780 GPS
|
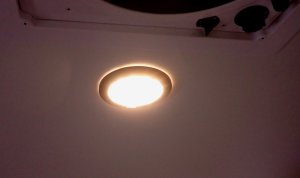
T@B Overhead LED Replacement
|
|
No more "Blinded By The Light"
Got tired of the ultra bright overhead LEDs blinding me at night. This replacement has a dimming feature so you can set the brightness by holding the button.
It remembers the setting and these unlike the original LEDs, do not draw any battery power or glow at night when off.
These are a direct replacement for the two overhead lights in our 2021 T@B 320 S Boondock.
The same screws/holes can be used and even the bezels are interchangeable. I reused the black one and changed the bathroom light to white like everything else in there.
Dream Lighting 12Volt LED Panel Light
|
T@B Modifications T@B Accessories
| |
|
The content offered here is subject to change without notice and we are not responsible for any mistakes or errors found in the linked pages or the information offered on this web site.
Associate Links - I may earn from Amazon or other link qualifying purchases which help support this web site. These links do not increase the buyer's cost.
Original graphics and content may not be used without permission. All brand names and logos are trademarks of their respective companies.
Copyright © 2026 Steve Johnson, Elbridge NY, All rights reserved.
| |
|
