


|
 |
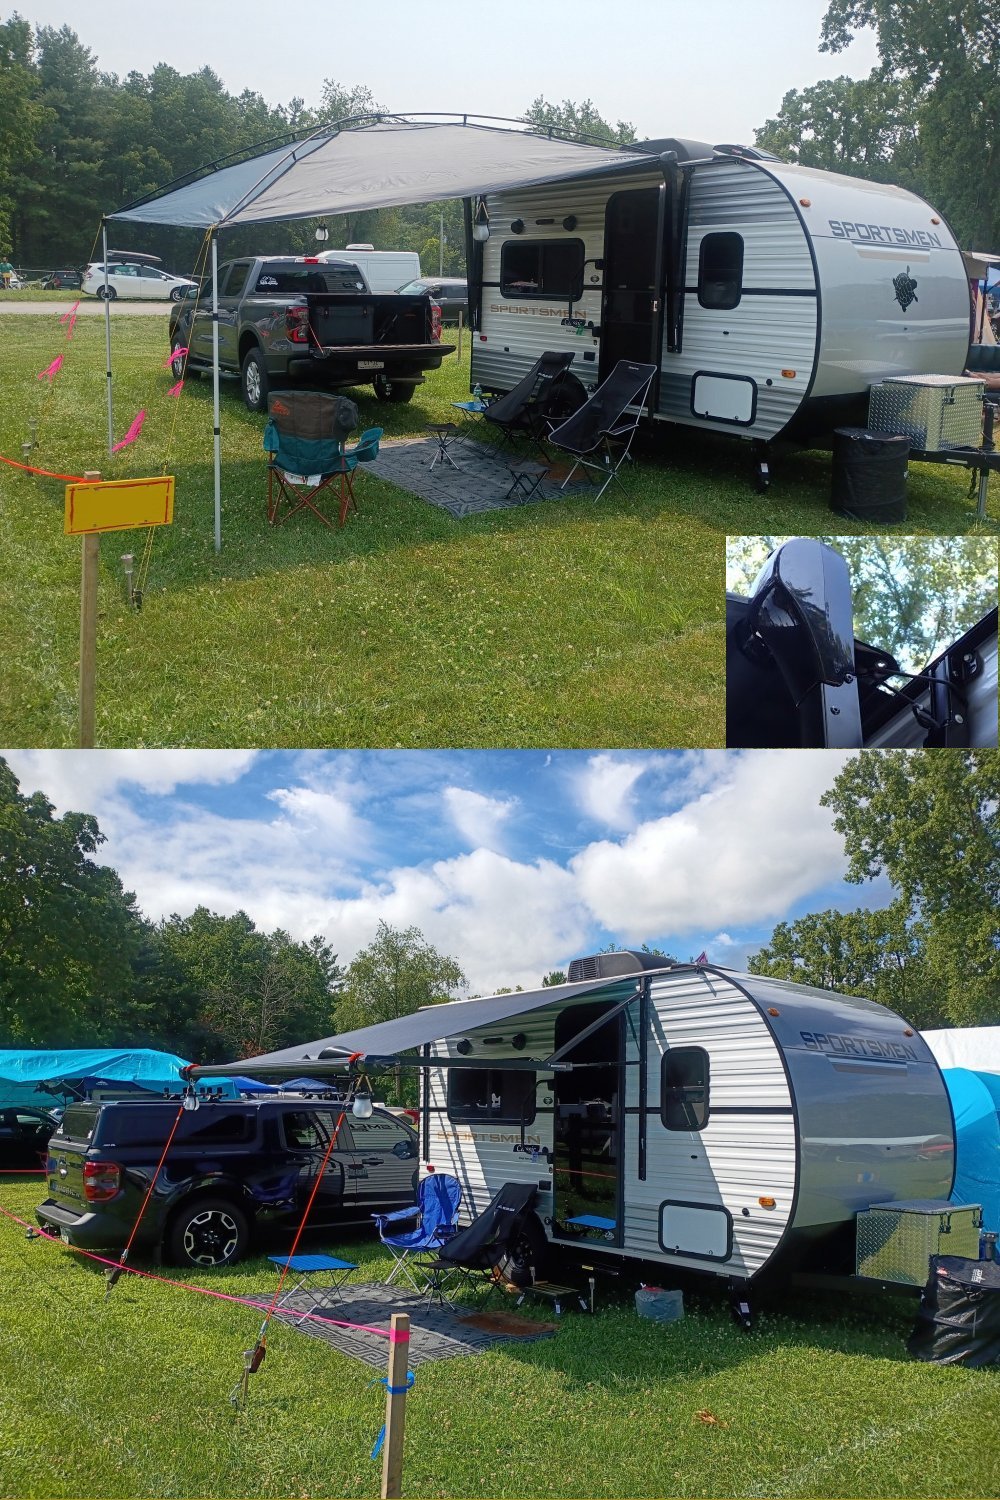
Steve Johnson's KZ Sportsmen
130 RD Camper Modifications
|


The modifications below are mechanical and electrical changes to our
2025 KZ Sportsmen 130 RD.
- Replacing the front 7 Pin Connection Box - IMPORTANT
- Adding a EMS/Surge protector - IMPORTANT
- Installing a Bathroom Fan (wife says it's important)
- Adding a TV
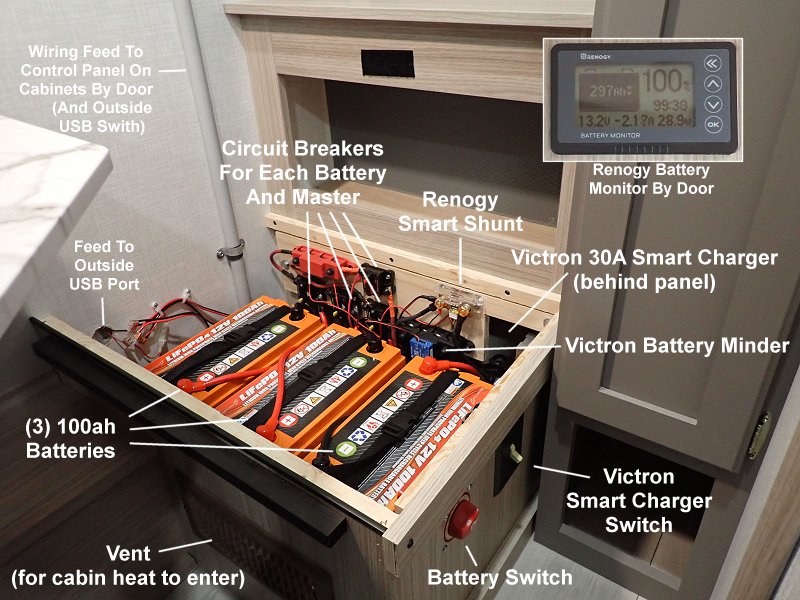
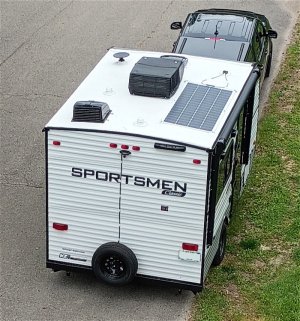
- Switching to Lithium LiFePO4 Batteries
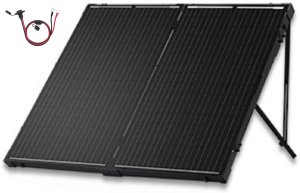
- Adding 200 Watt Solar Panels
- Installing a MaxxAir Remote Controlled Fan
- Some of the Accessories we find useful
- & more
Note that other 130 RDs, models and years may require different modifications or equipment.
After you check out my KZ modifications below read why I chose the KZ Sportsmen over the same size Forest River and Sun Lite campers with the same floorplan:
KZ Sportsmen 2025 130 RD, 2025 Auora 13RDX (Forest River), 2025 Sun Lite 13 BD, Review
|

|
|
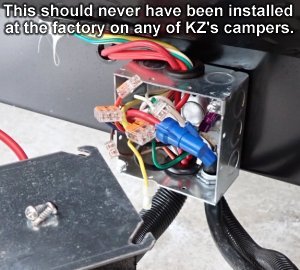
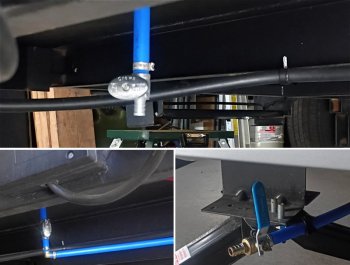
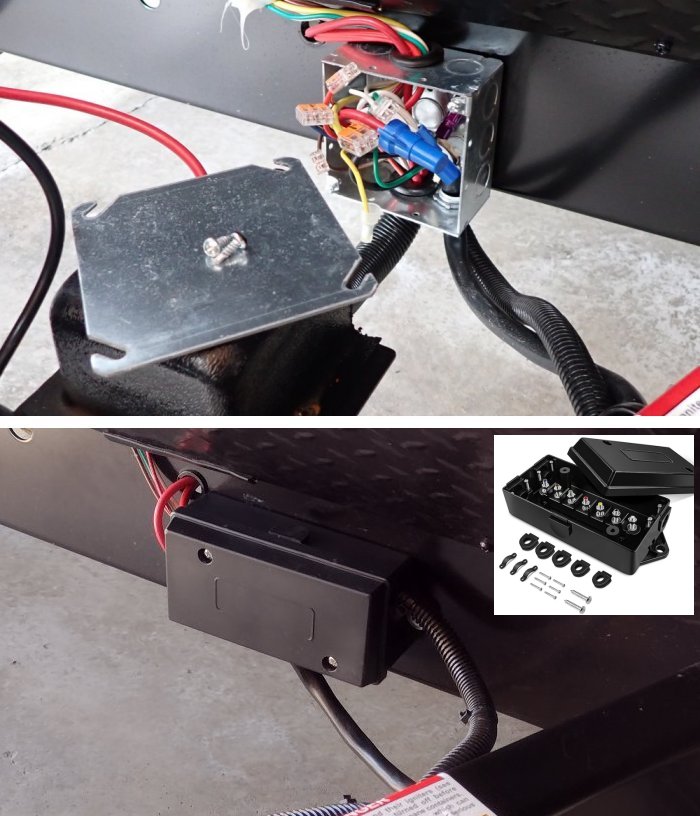
Replacing the non-weatherproof
electrical box
If you want to avoid electrical problems and safety issues down the road this is a must do.
The factory installs a regular indoor, non-weatherproof, electrical box on the outside front of the frame for all the 7 pin towing connections including the battery, solar, brake lights, turn signals, and camper running light circuits.
The box is exposed and connections in the box are non-weatherproof wire nut and Wago connectors that should not be exposed to moisture and weather.
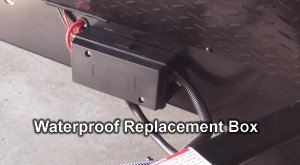
Having the box replaced with a weatherproof box that uses post type connections for each circuit is a must both for safety and to avoid electrical problems.
The replacement boxes are under $10 and can be easily sealed after install.
For most, this is something your dealer or a trailer repair facility should do.
This is the box I used:
7 Way Electrical Trailer Junction Box
|
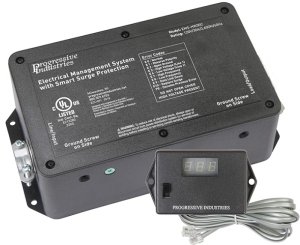
Adding a Surge Protector/EMS (Electric Management System)
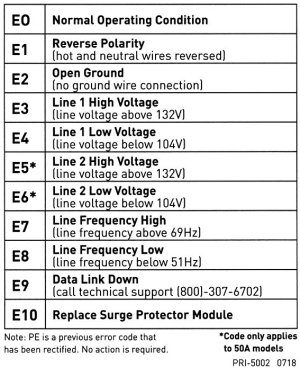
EMS-HW30C Error Codes:
The EMS/Surge I used:
Progressive 30 Amp Hardwired System w/remote display
Other Models:
Progressive 30 Amp Hardwired System no remote display
Portable outside version
(no wiring needed):
Portable EMS/ Surge Protector
|
|
Another important modification you can make to your camper is to add a EMS/Surge protector to your electric/shore AC power input.
Surprisingly, one of the lesser problems you run into at a campground are electrical surges. More damage is done by low voltage and mis-wiring from campground power than power surges from lightning strikes.
Running on low voltage (the most common problem) can damage air conditioners, refrigerators, and other electrical equipment in your camper.
Mis-wired shore power outlets can do immediate damage and a broken or mis-wired ground can actually give your camper a "Hot Skin" where when you touch the camper, you can get electrocuted and die (not kidding).
A quality EMS in line with your AC hook-up will check for these wiring problems and actually shut off the power automatically to protect your family and your equipment (see error codes at left).
When the problem is corrected it will sense it and turn the power back on automatically.
One of the most widely used Surge/EMS systems that gives a lifetime warranty is Progressive Industries. They make both a hardwired version and a portable version you plug into the campground
supply and then plug your camper into it. I chose the hardwired 30 amp EMS so I didn't have to deal with a unit hanging on a post outside where it might disappear.
A hard-wired EMS inside the camper will also monitor the connections in your outside cord. It comes with installation instructions and nice big diagrams to show the connections.
I mounted our 30 amp unit behind the 130RD's converter under the sink. This one has a remote display I mounted on the wall inside the cupboard under the sink so I can open the cabinet to see any error code if there's a problem.
|
Larger Photo
|
|
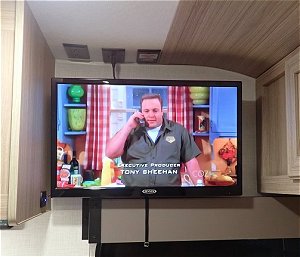
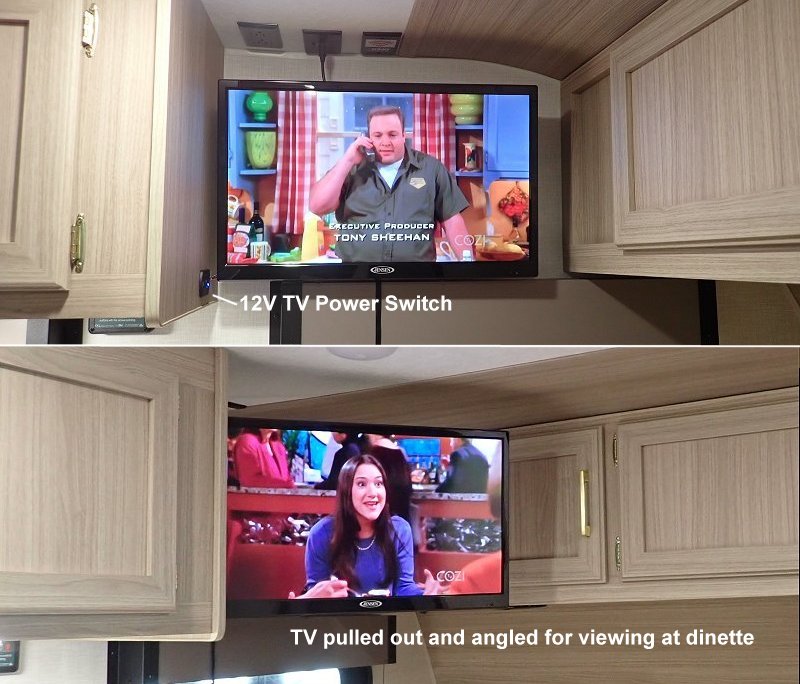
Addition of a TV
We also use our 130 RD camper for antique shows and music festivals. It comes prewired with an amplified TV antenna but no TV. For us, over the air local TV stations are nice to have.
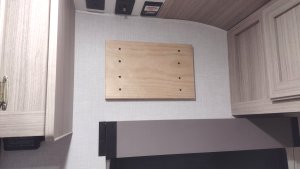
There is a sticker on the wall of the 130RD under the antenna connections showing that it's prepped for mounting a TV. Normally this would mean that the wall has a wood panel behind it strong enough to mount a TV bracket and hold a TV.
On our 130 RD there wasn't anything behind the thin wall board. I added a wood panel between two of the wall studs to mount the TV bracket on. The bracket locks for traveling and allows the TV to be angled down for viewing from the bed
and allows the TV to be pulled out away from the cabinets so it can be seen from the dinette.
Since we mostly boondock with no hookups the TV is a 12 volt, 24" Jensen television (largest that will fit there). I grabbed power from the light circuit over the sink and mounted a power switch for the TV and DVD player on the side of the kitchen cabinet.
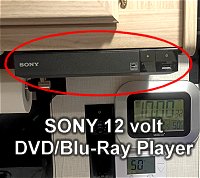
We carry a notebook full of our favorite movies on DVD and Blu-Ray disks to watch when the weather is bad.
We use a SONY 12 volt Blu-ray/DVD player which I mounted under the kitchen cabnet
|
Installing A Bathroom Fan
in our 130 RD
|
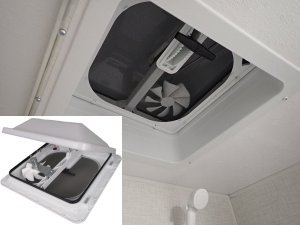
How I added a Bathroom Fan in our KZ 130 RD.
Even though the 3D photo of the 2025 on the KZ web site shows a bathroom vent with a fan, sometimes KZ only supplies a vent.
A fan allows much more airflow to get rid of moisture and bathroom smells.
Removing an entire vent involves getting on the roof, removing the sealant and the vent, then putting in a new fan/vent combination and resealing it. Something I didn't want to do for just a bathroom fan.
The existing vent in my 130 RD is made by Ventline. Looking closely at the existing bathroom vent I noticed it has the mounting holes for a fan assembly. Checking photos of other Ventline vents, I noticed their
fan vent uses the same mounting holes.
I purchased a new Ventline with a fan and just removed the fan and wiring from the new vent and mounted them in the existing holes of the bathroom vent from the factory. No removing and adding a new vent needed. Saved a lot of time and effort.
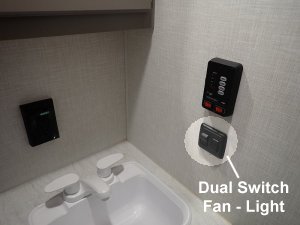
I pulled the bathroom light and grabbed 12 volts from it for the fan. The fan has it's own switch if you want to reach up in the shower to use it. I don't. I pulled the bathroom light switch from the wall and fished a pair of wires down to it and added a dual switch on the wall
so now there's a more convenient switch for the light and a switch for the fan right there next to the sink.
We now have a bathroom fan to get rid of smells and to draw moisture out after using the shower.
Ventline 12V DC Powered E-Z Lift Vent/Fan
|
|
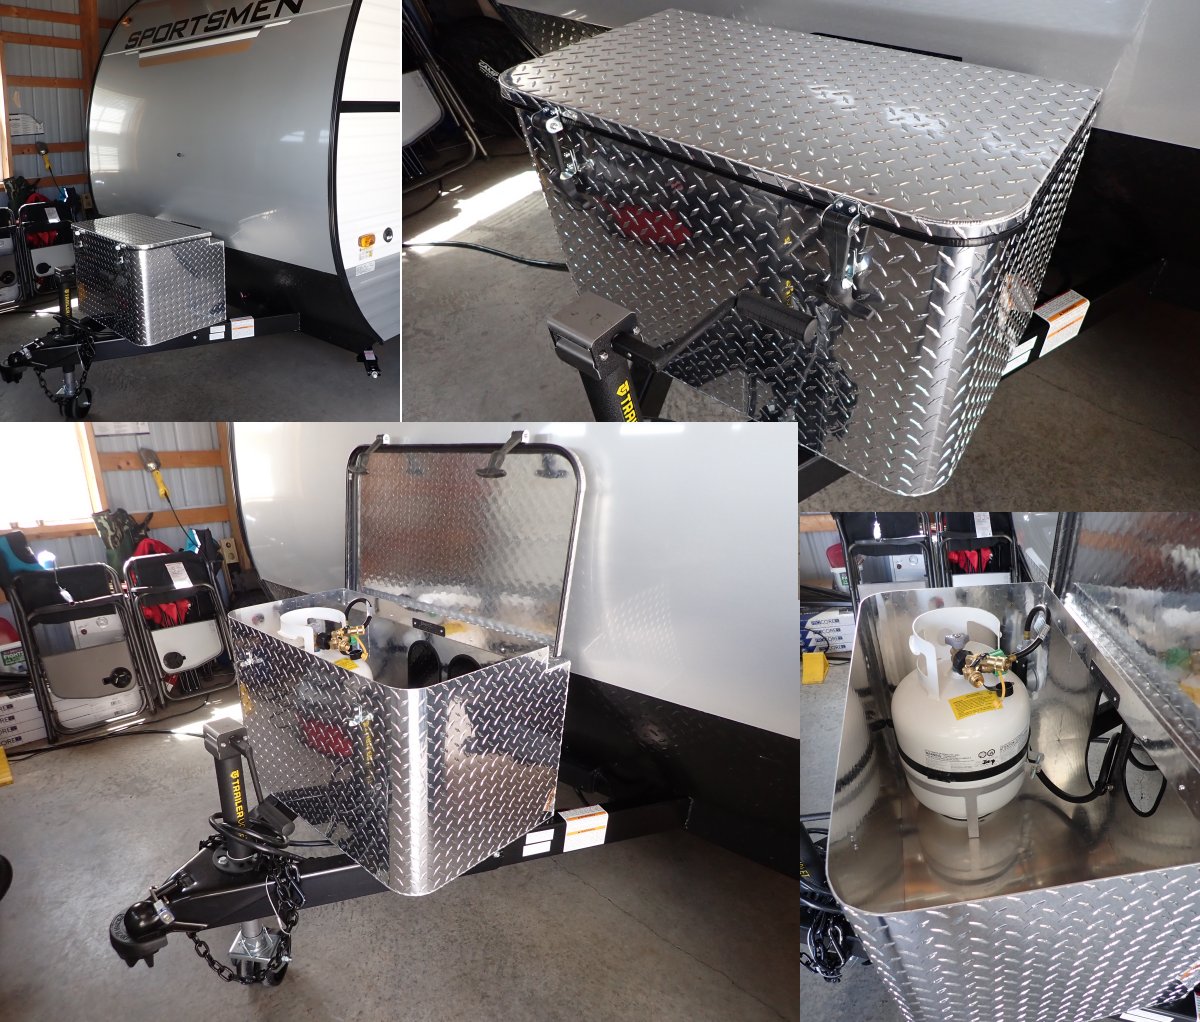
Front Propane/Storage Bin
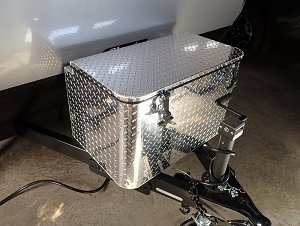
This front storage bin from Sea Biscuit Metal Designs fits nicely on the tongue of the KZ 130 RD
and holds up to two 20# propane tanks or a single tank with plenty of additional storage.
The cover keeps everything protected from the weather. I added one to keep the propane tank and regulator out of the weather and also store all my wheel chocks, levelers, tent stakes, etc. I use for set-up.
It came with the mounting hardware to attach it and came with a propane tank bracket and holes for venting and hose access to the propane tank.
Larger Photo
Sea Biscuit Metal Designs
|

| |
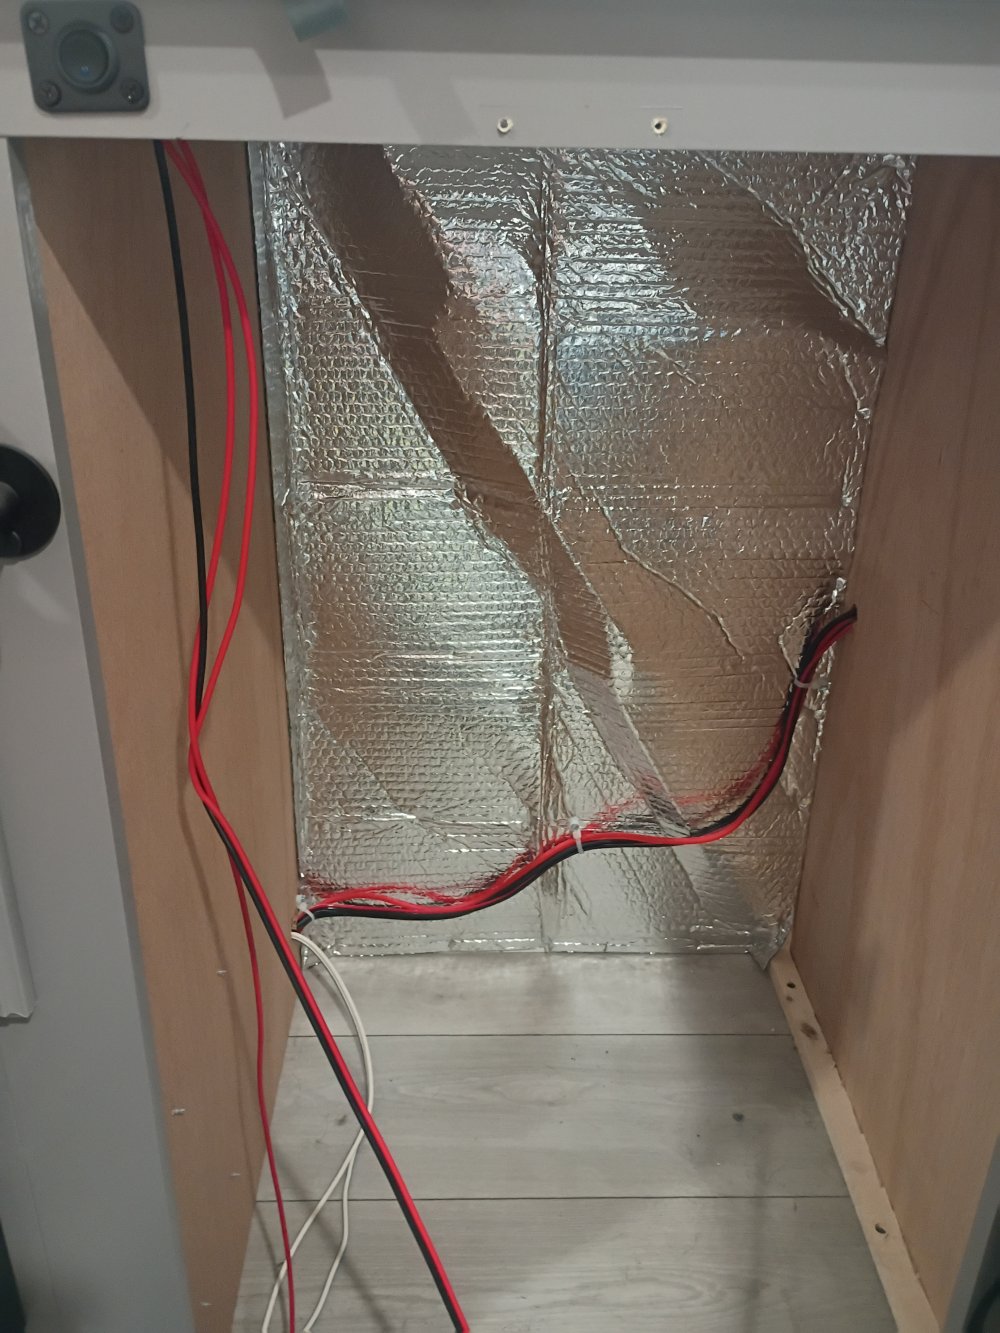
Helping The Fridge Stay Cool.
Pulled the Refrigerator out and added a layer of bubble insulation to the outside wall. If the driver's side of the 130 is in the sun all day, that wall will heat up even with the factory insulation in the wall.
The additional insulation should help the fridge stay cooler when that side is in the sun.
The insulation is stapled securely around the four outside edges. There's enough space behind the fridge so there's still plenty of space for the needed airflow.
Larger picture
Type of insulation I used: Bubble Insulation Sheet
|
| |
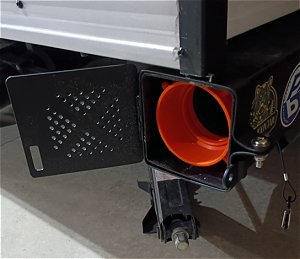
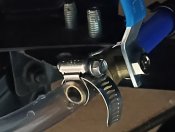
Installing a new Jack
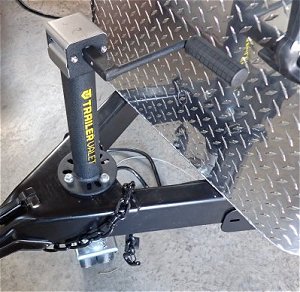
The original front jack handle on my 130 RB worked okay but was facing forward and wouldn't allow the tailgate on my truck to open..
I have a small pick-up and the 130 RD's forward facing jack handle would block the tailgate from being lowered all the way when the camper was hitched to the pick-up.
The solution to opening the tailgate when hitched was to find a jack that could be installed with the crank handle on the side, not the front. I found the Trailer Valet Center Mount Tongue Jack that
could be mounted at a 90 degree angle so the jack handle would not be in the way of the tailgate when lowered. As a plus, the jack handle can be quickly removed (no tools required)
and an included adapter slides on the jack to allow the use of a power drill to raise and lower the jack if you wish. It's available in a 5,000 pound version. The top can be removed for lubrication.
|
Overhead LED Light Replacement
|
|
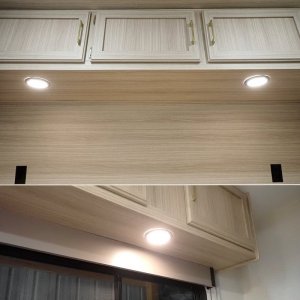
No more "Blinded By The Light"
The ceiling lights from the factory are very bright. These replacements have a dimming feature so you can set the brightness by holding the button.
It remembers the setting when turned off and back on.
I replaced the bright LED puck light over the dinette and the two puck lights over the bed so we're not blinded when they're turned on at night. The original lights are connected using "Wago" solderless connectors so the wiring is quick and easy using the same connectors.
I reused one of the three puck lights I removed and installed it as a second light over the kitchen counter so now there's lots of light over the sink and counter when needed for prepping and cooking.
Dream Lighting 12Volt LED Panel Light
|
|
|
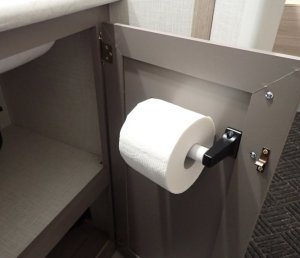
Where to put the toilet paper roll
on a KZ 130 RD?
It's a small bathroom (but not the smallest we've had), and the toilet paper holder was included but not installed.
There's not a lot of wall space for it and just about everywhere it would be in the way. The solution was to mount it inside the cabinet door under the sink.
Easy to get to, not in the way, and safe from shower spray.
|
|
|
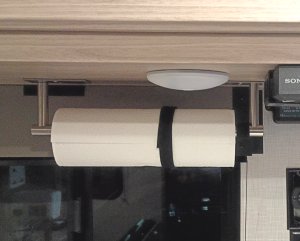
Paper Towel Holder
Mounted a paper towel holder above the sink. We use a length of hook and loop strap from Harbor Freight to keep it from unrolling when on the road.
Paper Towel Holder
Hook and Loop Strap
|
Larger Picture
|
|
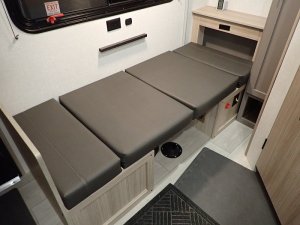
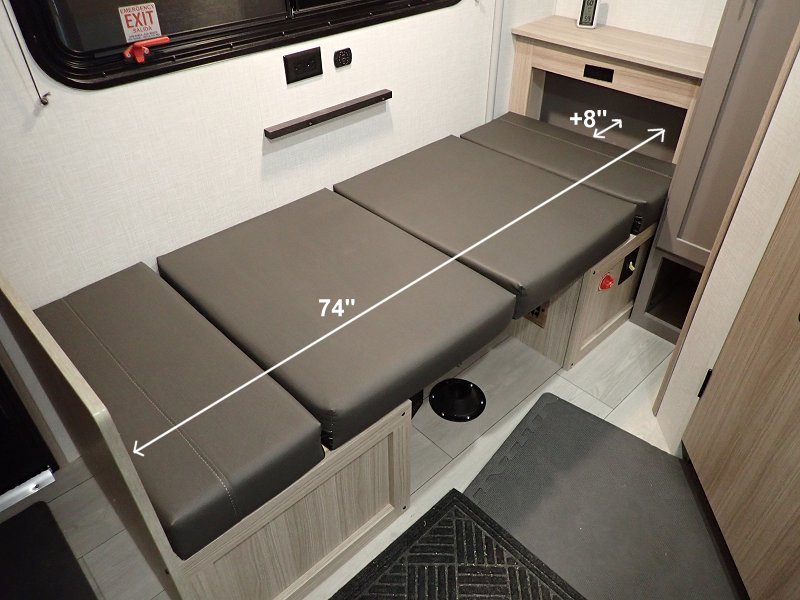
Dinette bed too short on your KZ 130 RD?
Here's an easy solution.
If you need to use the dinette bed, from the factory its long enough for a shorter person or a child. After all, it's only 66 inches long. Okay for those five feet or under but kind of short for everyone else.
I kicked out the center panel on the back of the rear seat and put in bottom at the same level as the seat's wooden base. We've added a 4" foam cushion that fits in there to match the height of the seat cushions.
You could also just roll up a spare blanket to bring it up to the same height as the seat cushions.
It's not a huge space but wide enough for your feet at night and increases the bed length an additional eight inches to 74 inches!.
Now even I can be comfortable sleeping there. That center panel behind the seat cushion back really doesn't support the cushion anyway and if anything, it gives you more storage back there.
The center panel I removed was just stapled from the back so a hammer and a block of wood removed it easily.
|

|
|
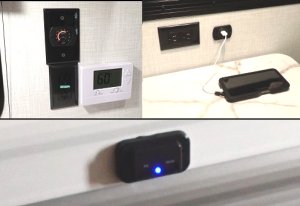
More USB Ports
We have a lot of things besides our phones that charge by USB ports. Mostly with the newer type C ports.
The 130 RD only came with one standard USB port above the counter in the kitchen and drew a little bit of current even when not in use... I hate that.
We boondock and I don't want anything drawing battery power unless we're using it.
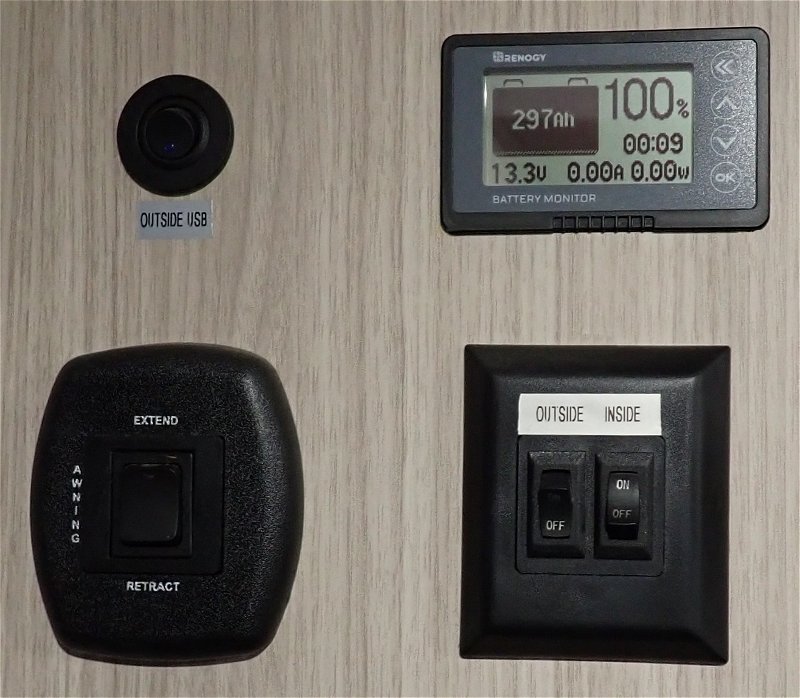
I've replaced it and installed two additional dual USB ports. One outside under the awning with an on/off switch inside by the door.
That one powers our string of awning lights and can power everything from lanterns, electronic bug repellers, our USB Bluetooth speaker, phones, and so on.
The kitchen replacement and an additional dual USB/USB C port installed at the table booth have and LED to show that they're on and a button on them to turn them on and off.
I now have installed a additional one at the end of the bed above the solar controllers on the door end for phone charging and nighttime use.
Dual USB Port
Dual Outside USB Port
|
|
|
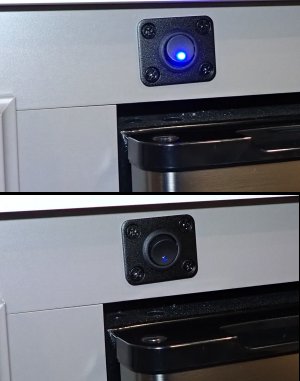
Refrigerator On/Off Switch
Remember how I said i don't like things drawing power when off?
I also don't like having to reset the fridge thermostat once I find the temperature I like it set at.
Installing a switch just above the fridge under the edge of the countertop was the answer.
BTW, I love the 12 volt fridges. They're very power efficient. I've had them for over three years now. Never going back to hoping the propane fridge will stay cool in the heat.
|
|
|
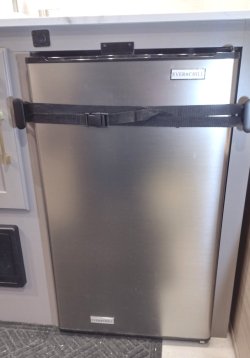
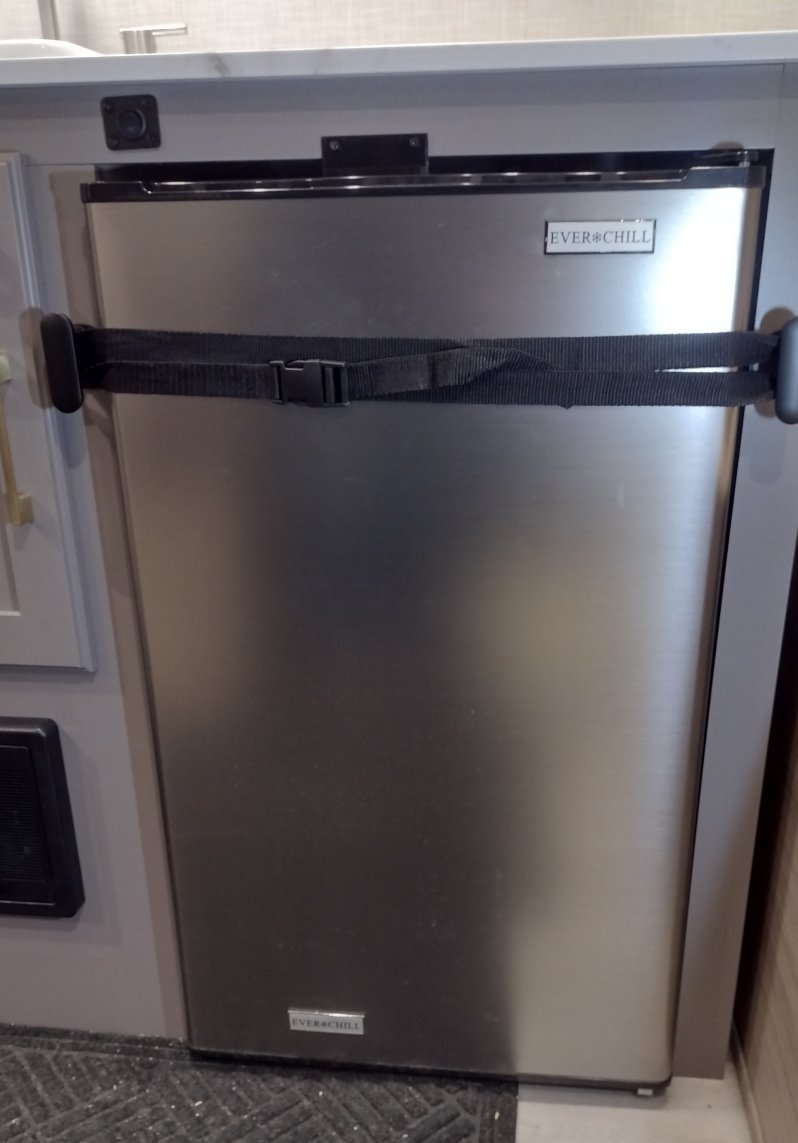
Keeping the fridge shut when towing
Speaking of Refrigerators...
The fridge KZ puts in the 130 RD has no door latch. It's magnetic but not strong enough to keep it closed when on the road.
Why would someone even design an RV fridge with no latch?
Forced to literally think outside the (ice) box.
Tried different freezer locks that would fit the side of the fridge and cabinet but couldn't find one that fit and would keep the door closed tight.
I added a bathroom hook on each side of the door to hold a strap.
The strap works. That door isn't opening anytime soon.
|
|
|
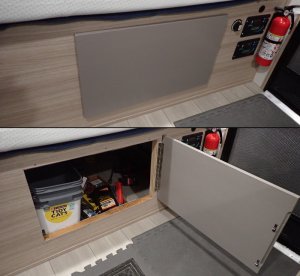
Storage Compartment Access From Inside
Most of the other campers we looked at had access to the under bed storage compartment from inside without picking up the bed.
This was my fix for the KZ Sportsmen 130 RD. Had to remove one vertical support and add two more, one on each side of the new door location and frame it in.
Note that I also added a vertical 2x4 support under the center of the bed platform as there is no center support to the floor for the bed.
|
|
|
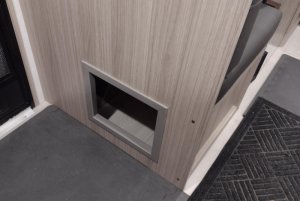
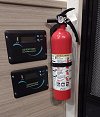
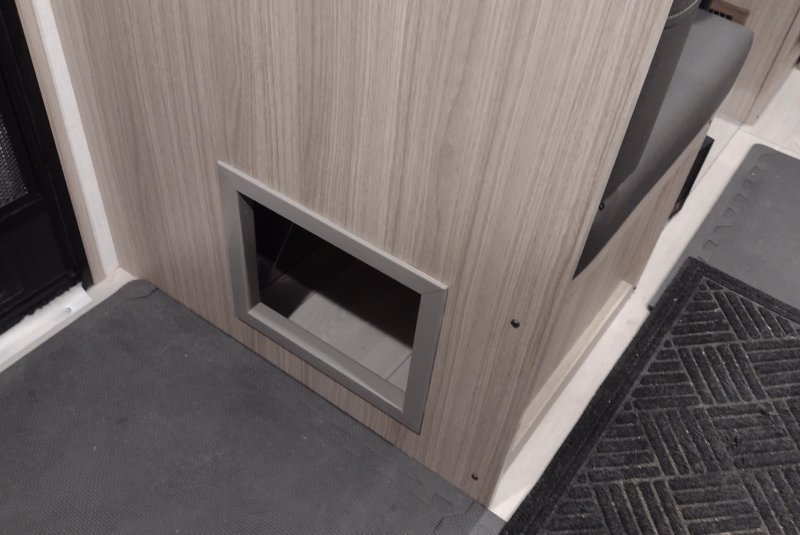
Shoe Storage
I cut a hole in the back of the dinette seat next to the door for access to the storage area under the bench seat.
This will keep the floor clear and utilize that storage space for our shoes, boots, and sneakers without having to pull the seat cushions and plywood up to access them.
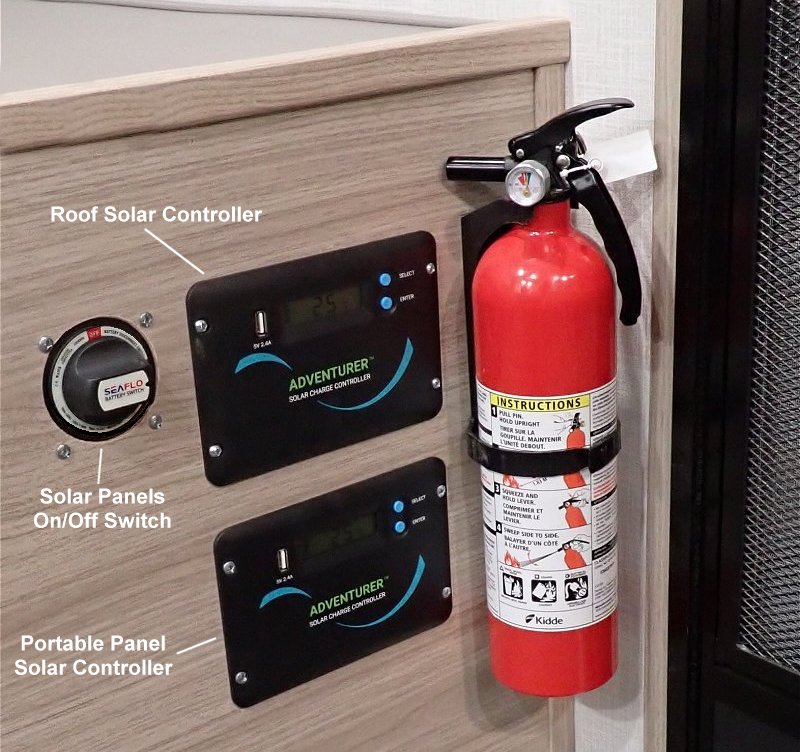
| The fire extinguisher was mounted in that spot at the factory where it was in the way and everyone would kick it. I moved it to the other side next to the door out of the way. |
|
 |
|
|
|
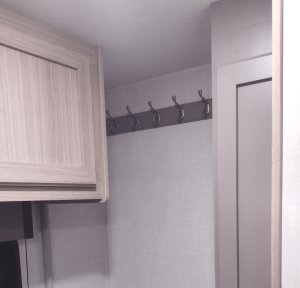
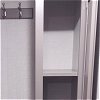
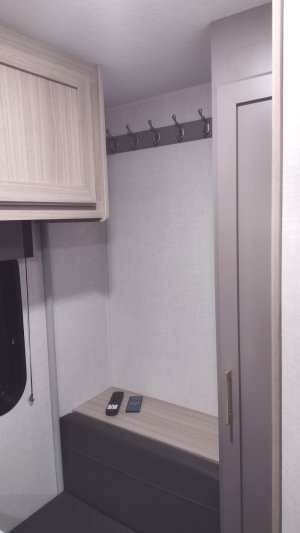
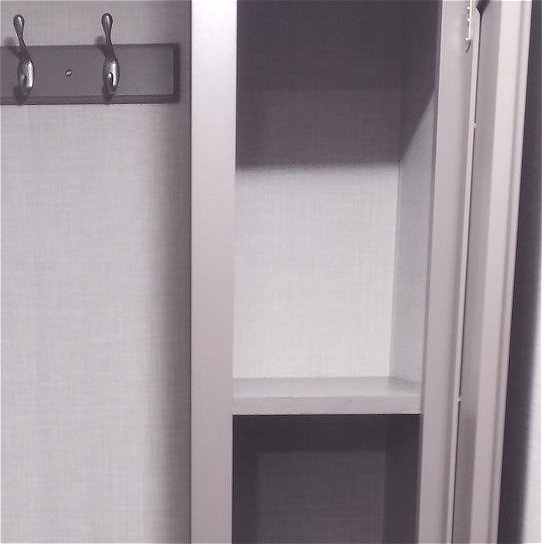
Coat Rack
Was wondering what to do with this unused space in the back corner behind the dinette.
It's a great spot for a six hook coat and hat rack to keep jackets and hats out of the way but still easy to grab.
Fits perfectly in that space: Coat and Hat Rack
 |
| |
| While I was at it my wife wanted another shelf in the cupboard next to it that she's going to use as a pantry for food storage.
|
|
|
|
|
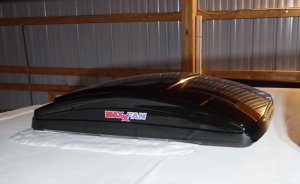
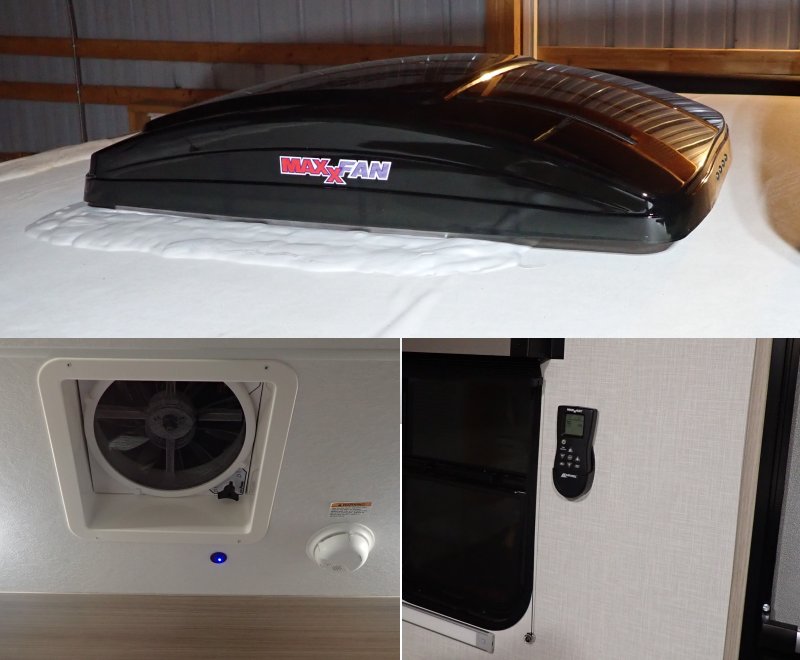
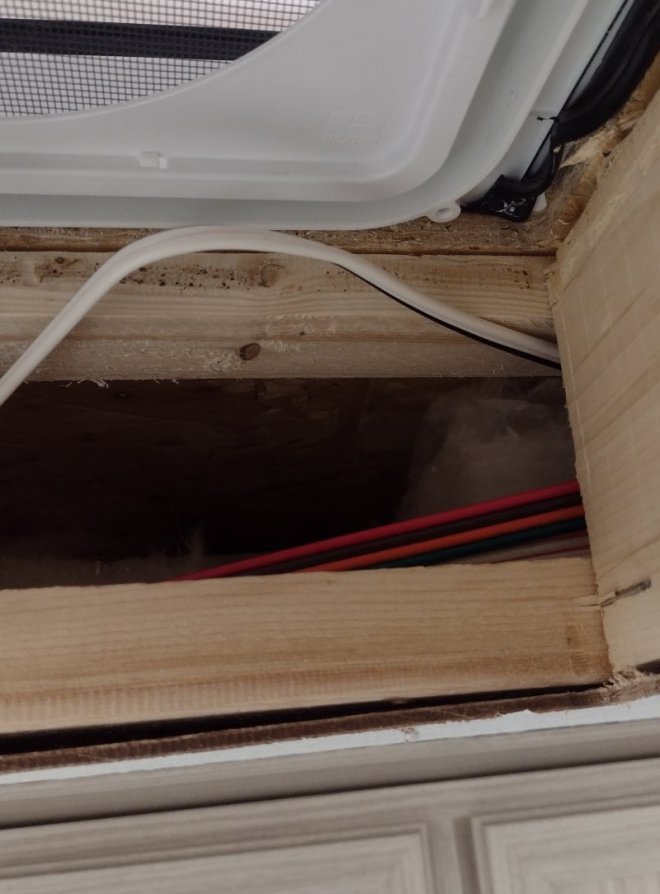
Replaced the Main Vent with a MaxxAir Fan
I replaced the vent with a MaxxAir Deluxe Fan. I installed an on/off switch next to it so when we're not using it, it draws nothing from the battery.
Mounted the remote for it next to the head of the bed by the door.
Power to the TV antenna amplifier ran right next to the opening in the ceiling so I used that to get 12 volts for the fan. (white/White/Black pair)
Larger Picture - inside/outside
Picture - Front Fan Power
|
|
|
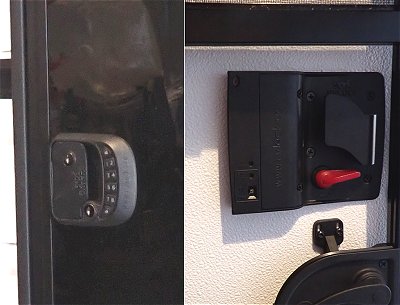
Yes, an RVlock keypad fits...
I replaced the standard key lock with a new electronic lock from RVLock.
The Compact RVLock model fit fine in the glass door and it's nice not having to carry keys at the campsite.
RVLock Compact Keyless Entry Handle
 |
|
A compartment lock with matching key is also available. It replaces and fits my compartment lock.
RVLock Key Latch
|
|
|
|
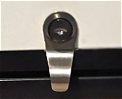
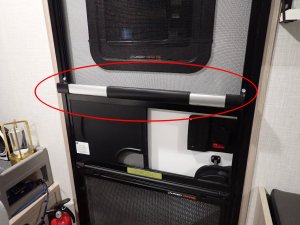
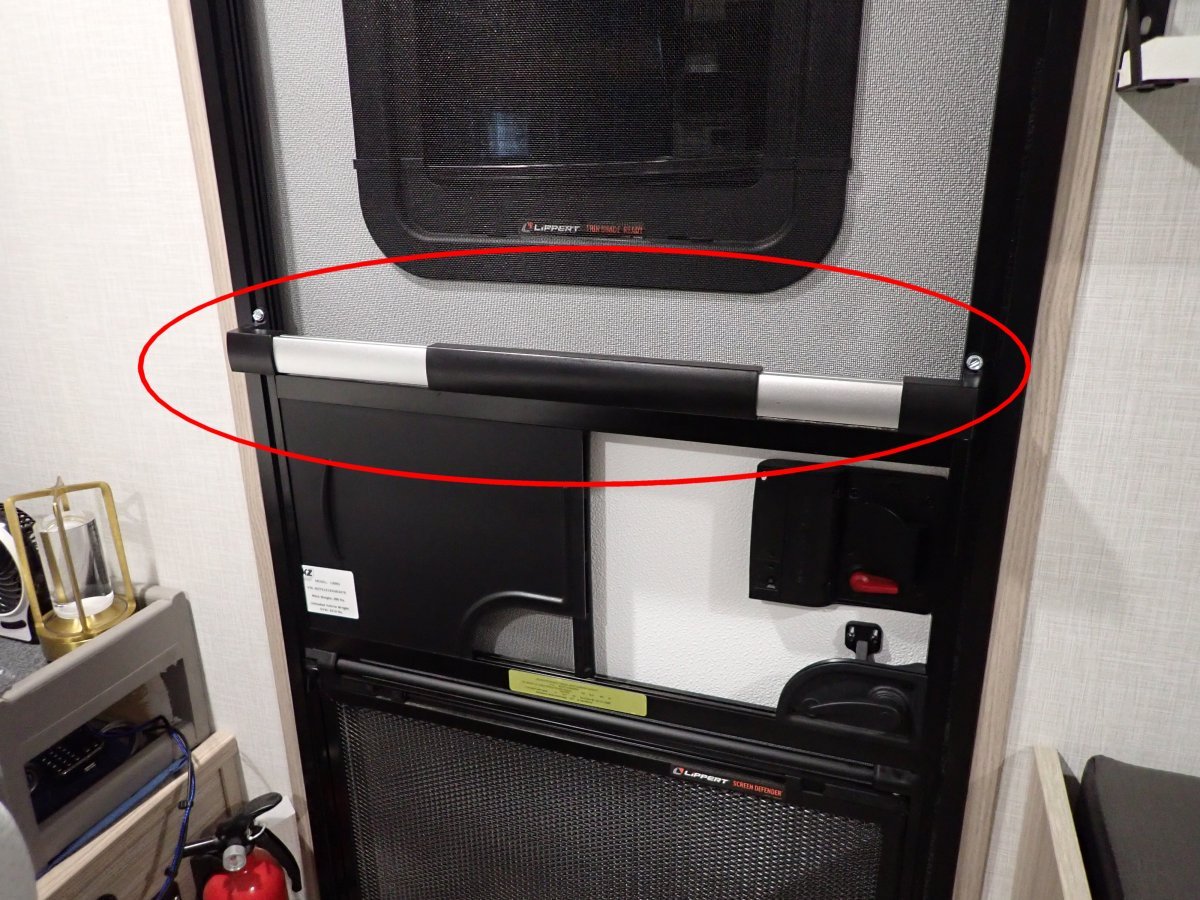
Screen Door Push Bar
While we're on the subject of the door, I added this screen door push bar. Nice to have something to push the door open instead of hitting the screen and something larger to grab onto to pull the door shut.
Larger Photo
May be purchased here: RV Screen Door Push Bar
|
|
|
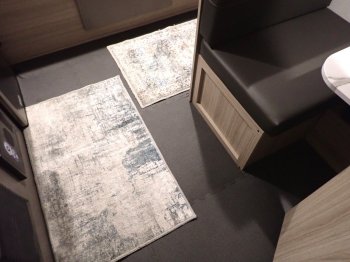
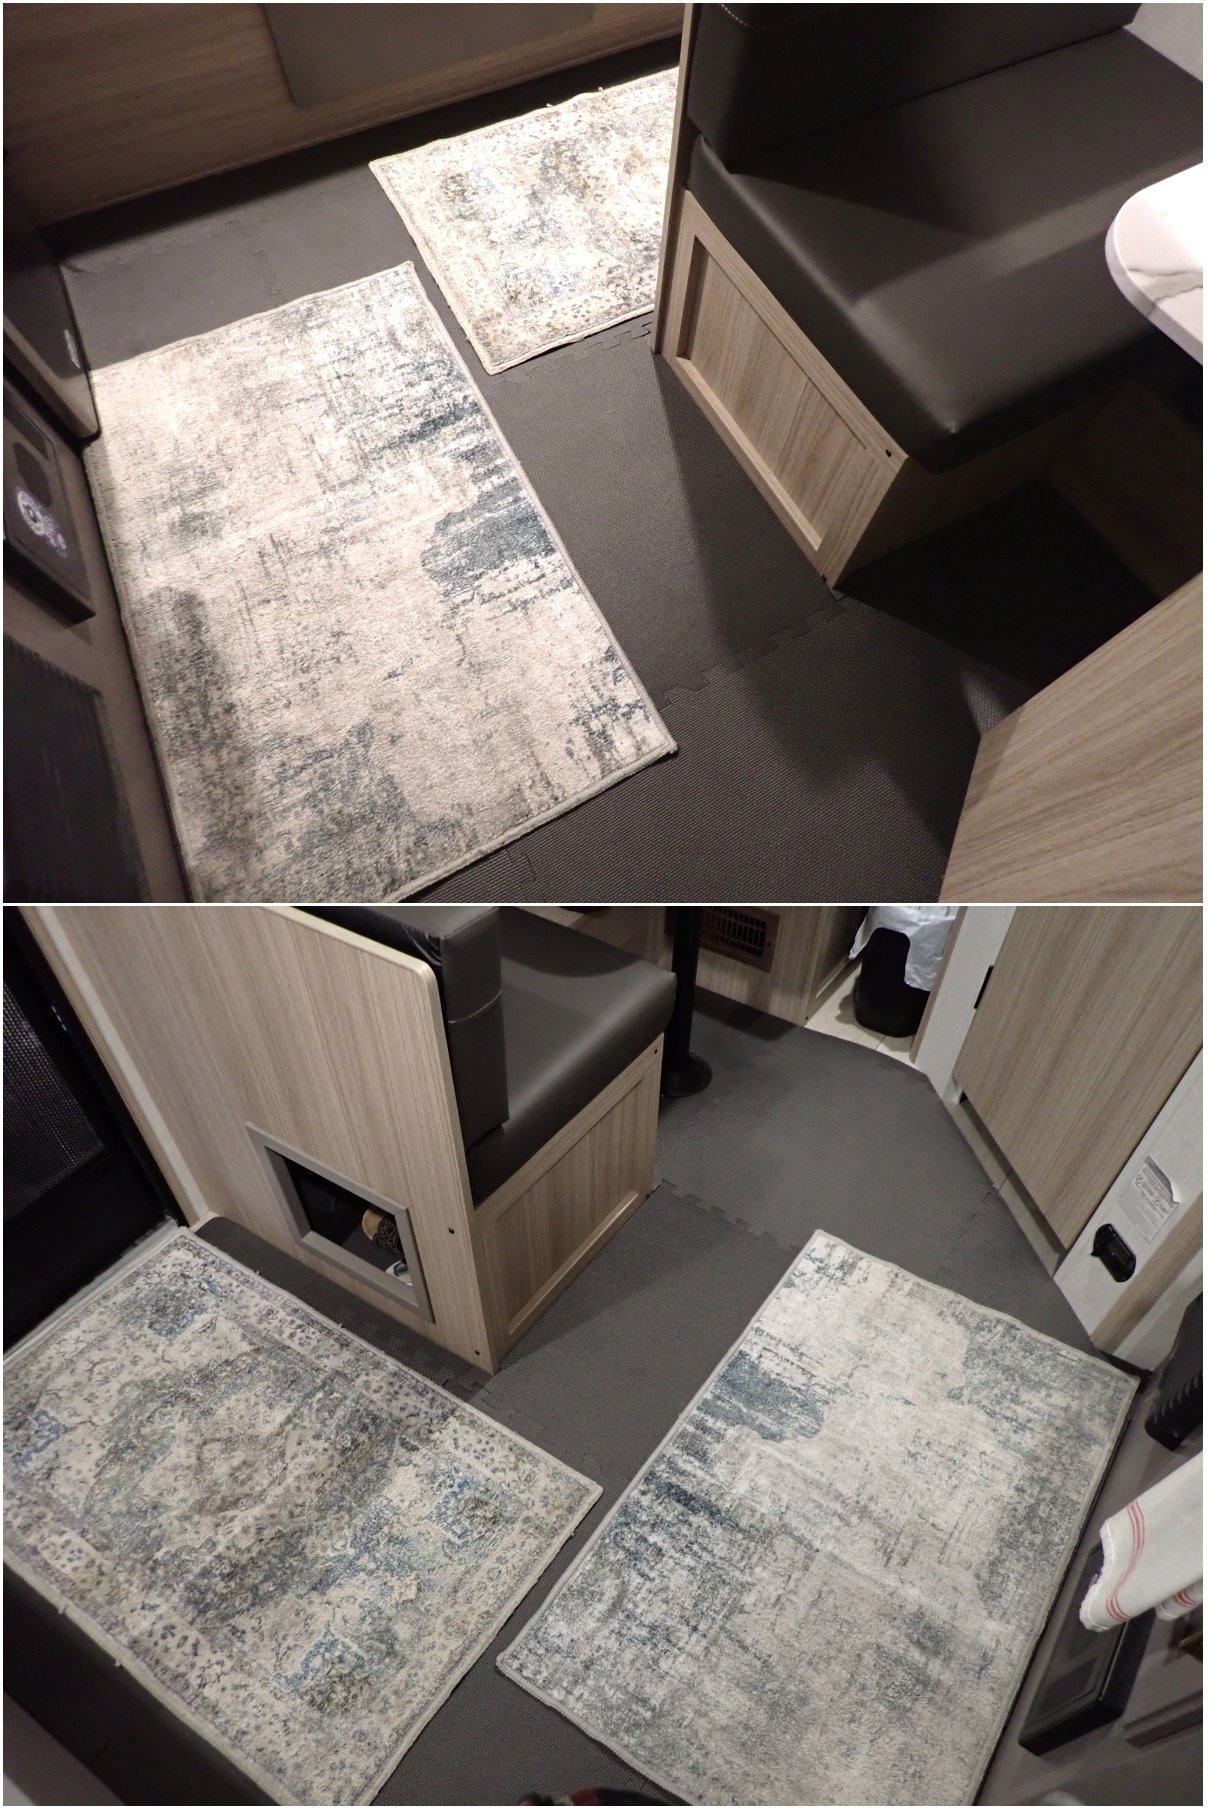
Nice cushy floor to walk on...
I threw down a couple of Anti-Fatigue floor Mat squares to protect the floor while doing all the upgrades. It felt so good that I went ahead and bought a couple of sets (4 squares each) from Harbor Freight
and did the whole floor by cutting them so they fit wall to wall.
Now the floor is soft on the feet (we don't wear shoes inside) and the mats will help protect it. They're cheap and can be easily removed and replaced every couple of years if needed.
Larger Photo
Harbor Freight Floor Mats
|
Larger Photo
|
|
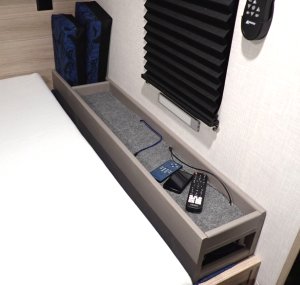
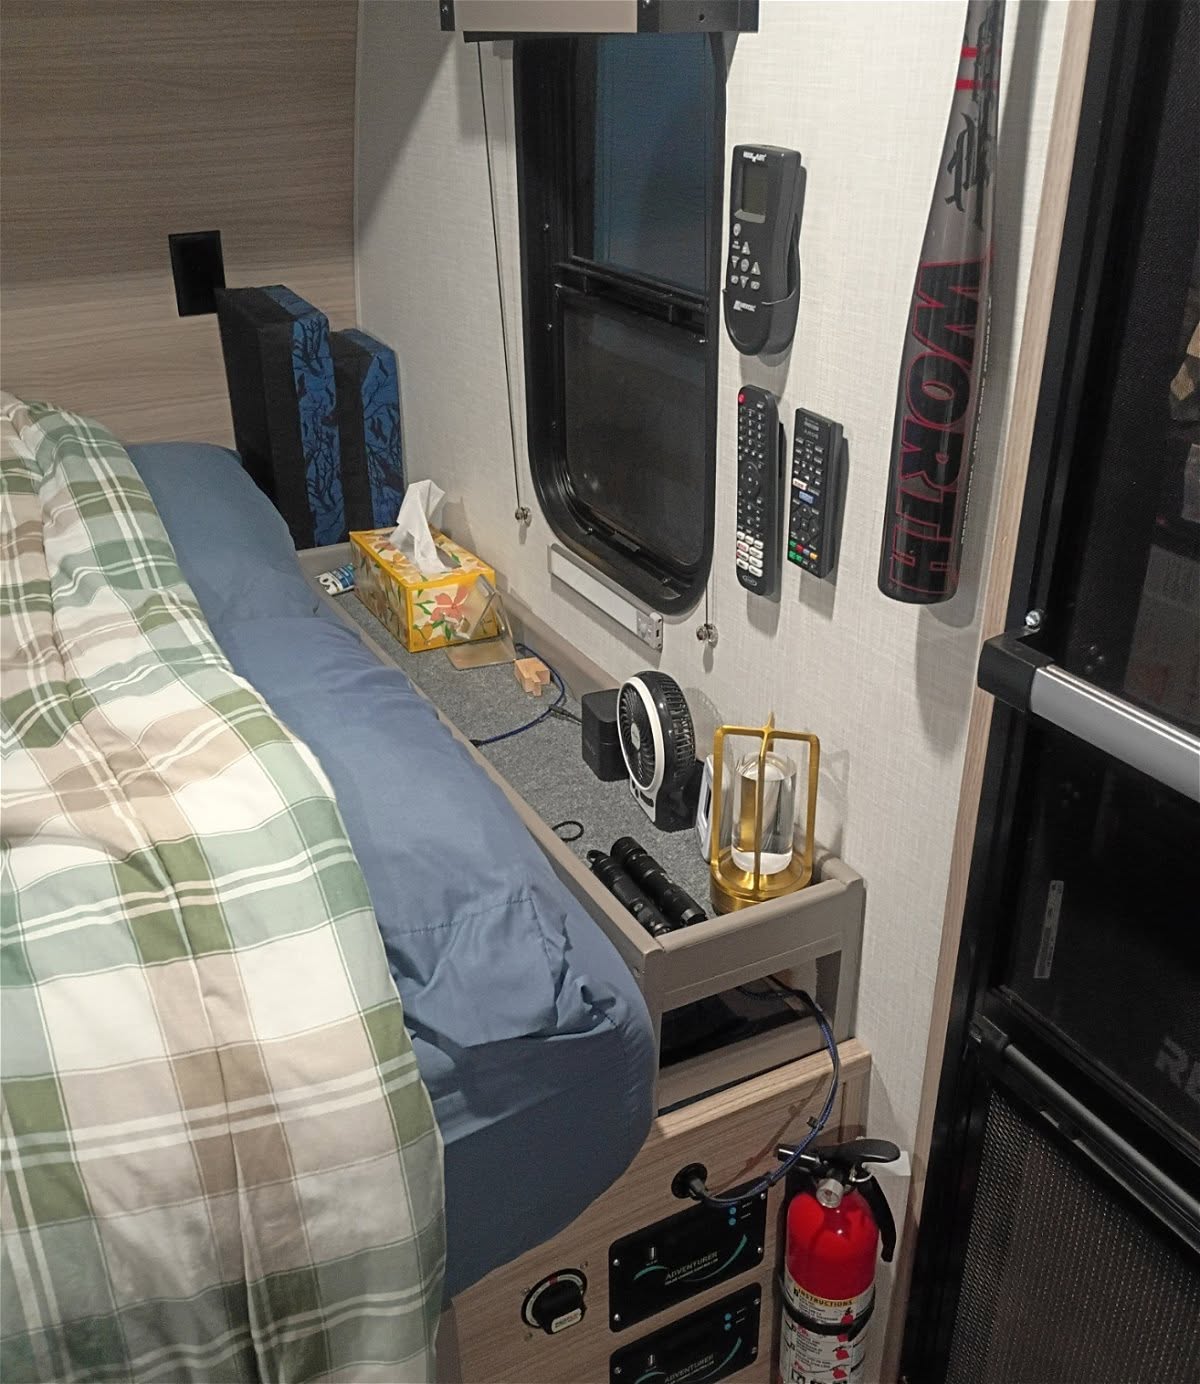
Headboard
There is lots of space between our mattress and the wall by the door. The difference in height between the mattress and the bottom made it hard to find things we put there at night.
I built a long raised tray to bring everything up to the level of the bed. It's a nice area to set things on like water bottles, phones, glasses, and the remotes at night so we don't have to fumble around for them.
I didn't want a lid as I would be constantly moving things set there to access the inside.
The matterss is normally be right up against it.
I added a couple of USB C charging cords for phones or other things that need to be charged. A piece of rubber backed indoor/outdoor carpet keeps everything from sliding around and with 2" sides it all can stay there while towing.
There's storage underneath to slide long things in the end like our hiking poles and It's painted to match the rest of the trim.
My wife made a couple of foam inserts (those things sticking up in the back corner) for the top tray if we want to raise our pillows for watching TV.
|
|
|
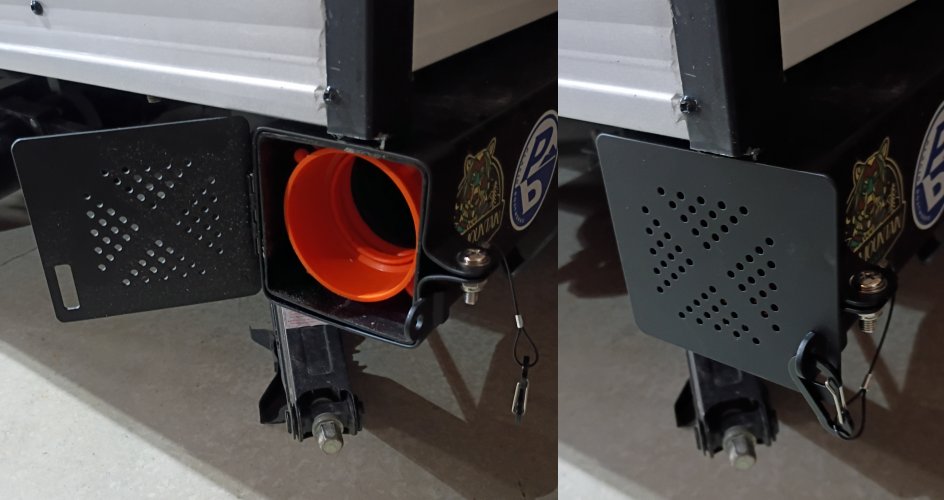
Bumper End Cap Hatch
Replaced the plastic bumper end cap with a easy to open Bumper Hatch Cover that has a latch.
Makes it easy to open the end for septic hose storage. Fits a 4"x4" bumper and won't wear out and eventually fall off like the plastic push-in end caps do.
Larger Photo (open and closed)
May be purchased here: RV Bumper End Cap
|
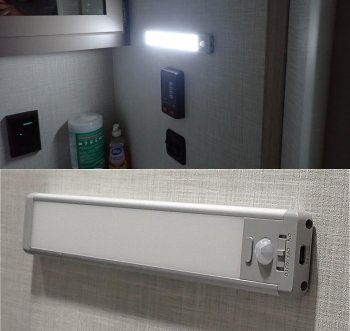
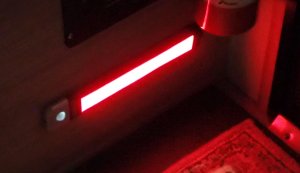
Motion Detection Light Strip (2 pack)
|
|
Motion Detection Lighting
Installed one of these 10" USB rechargeable and dimmable LED motion detecting lights in the bathroom. Comes on for a minute when you open the bathroom door at night.
I have it set just bright enough to get your business done without disturbing others.
Works so well I added one near the floor by the door with red gel paper over the lens so we don't trip over anything when entering the camper at night. Great for getting up in the middle of the night as well.
|
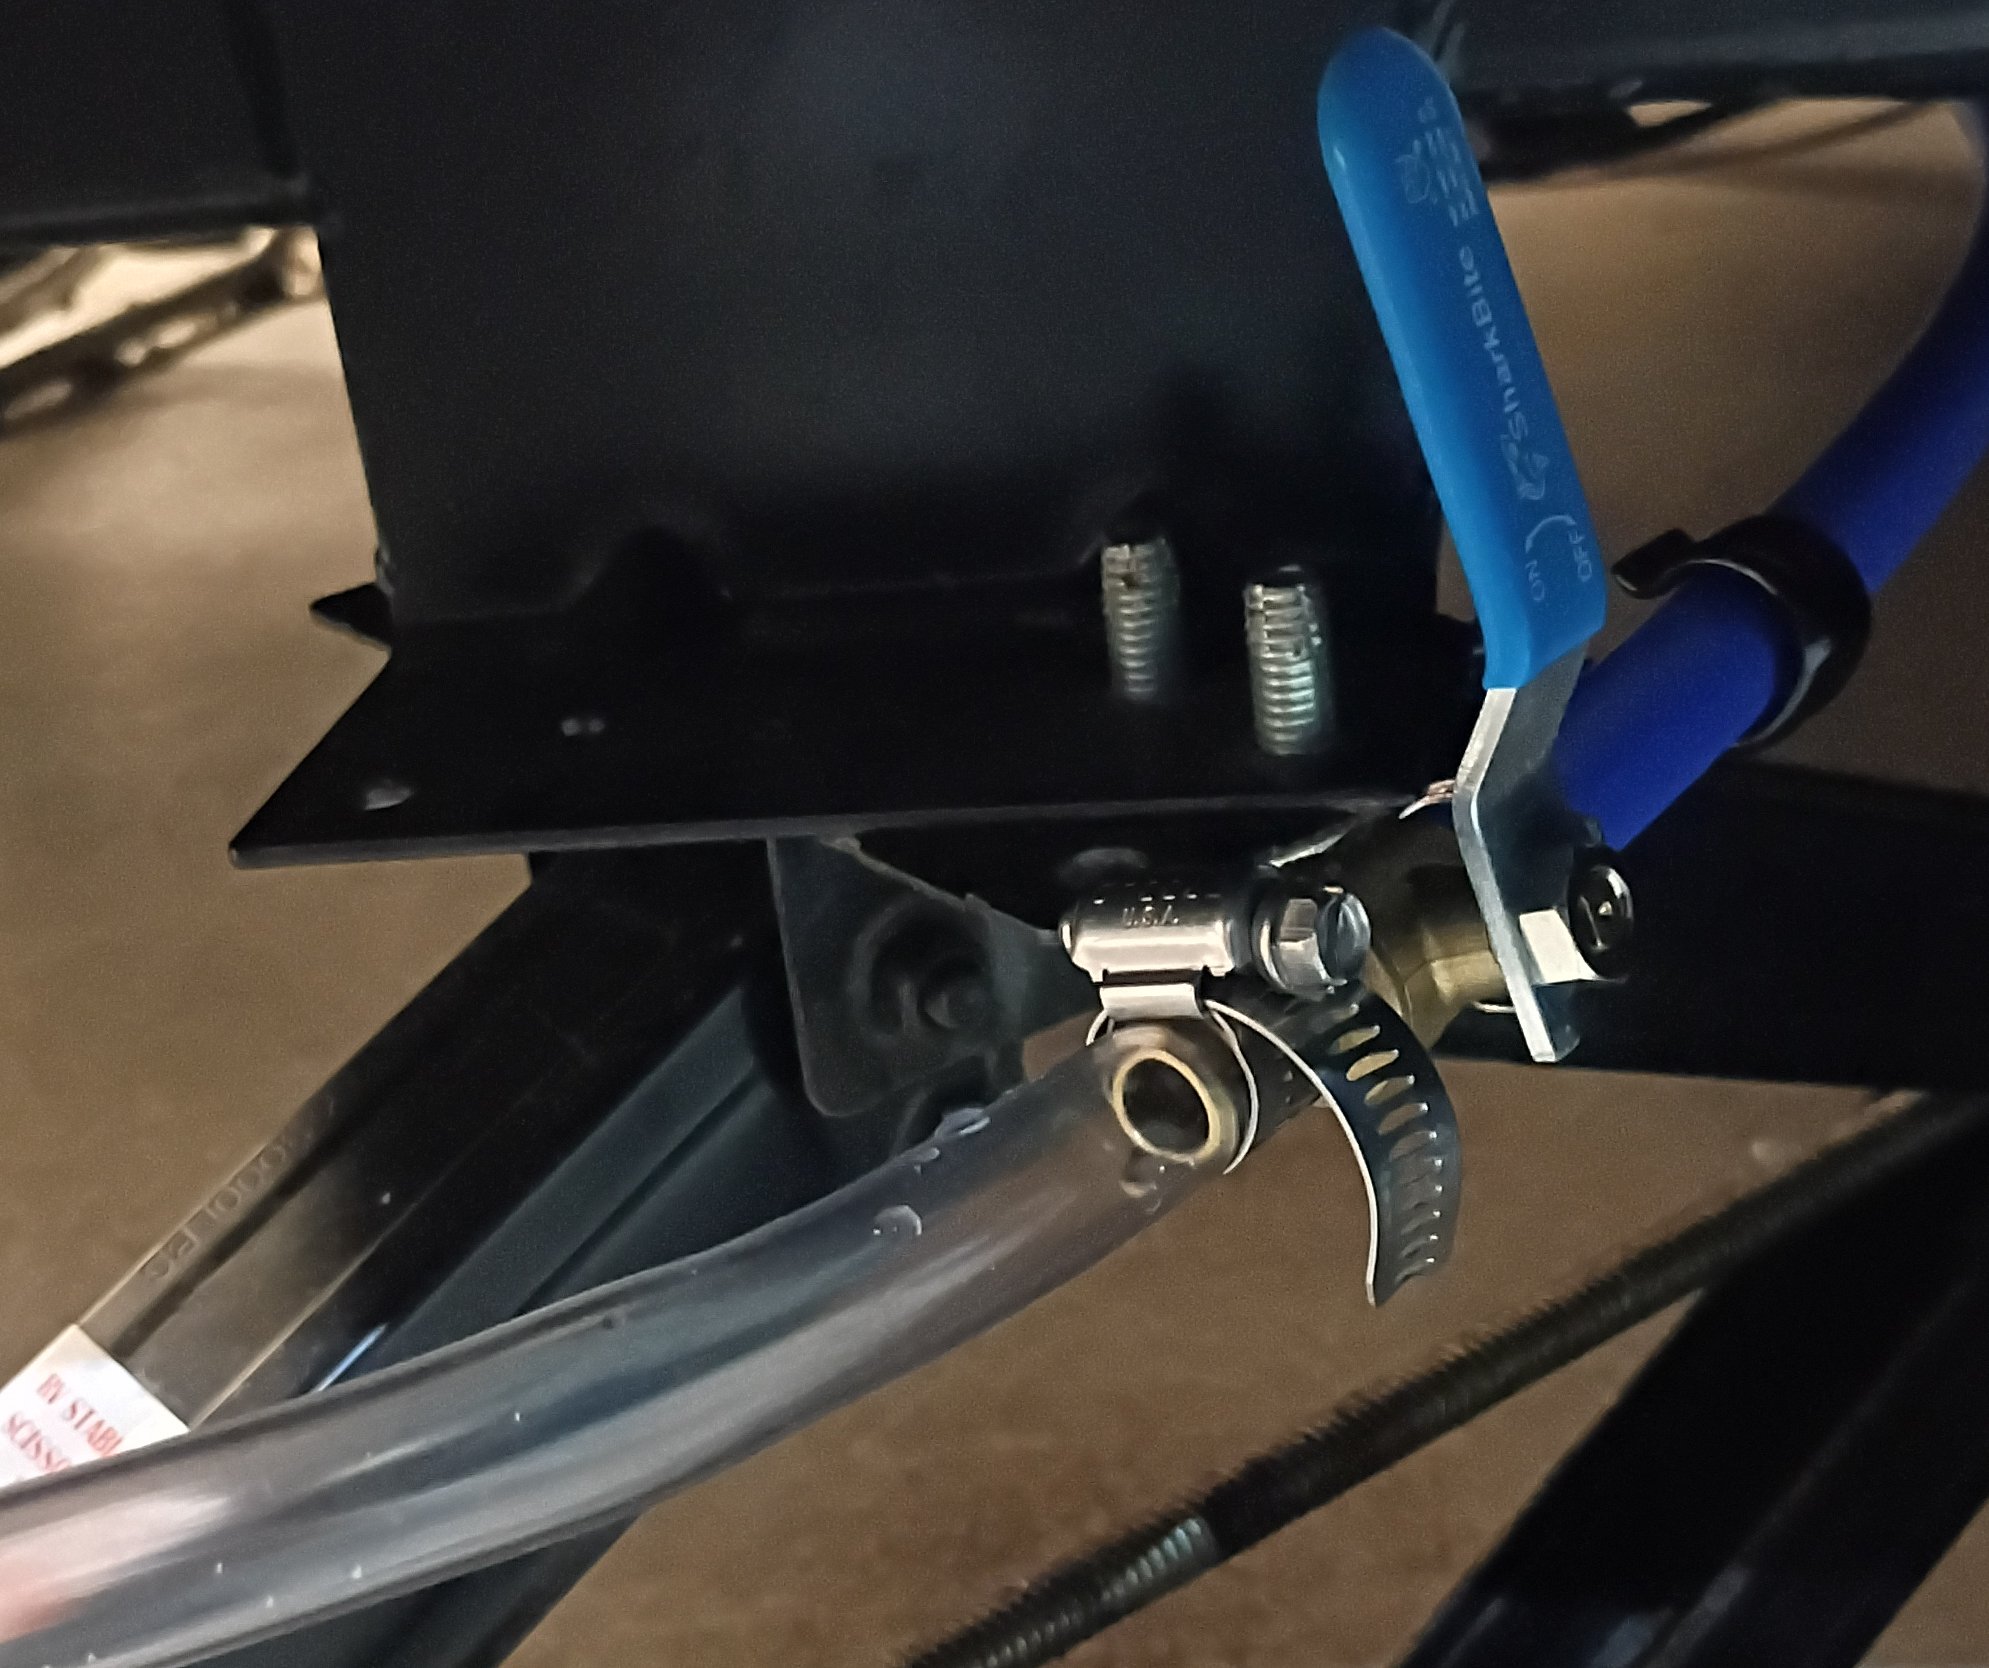
Moved The Fresh Water Tank Drain
Larger photo
|
|
You have to crawl under the front to get to the fresh water tank drain that hangs below the frame. It's a real pain to get to
Moved the original valve up above the frame and added a PEX extension with an easy to get to on/off valve on the driver's side above the front stabilizer.
I have 20 feet of half inch clear hose I can slip on the end and run it out the garage door to drain the tank when home. Beats emptying buckets or moving it out of the garage.
|
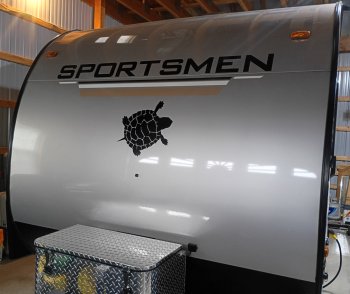
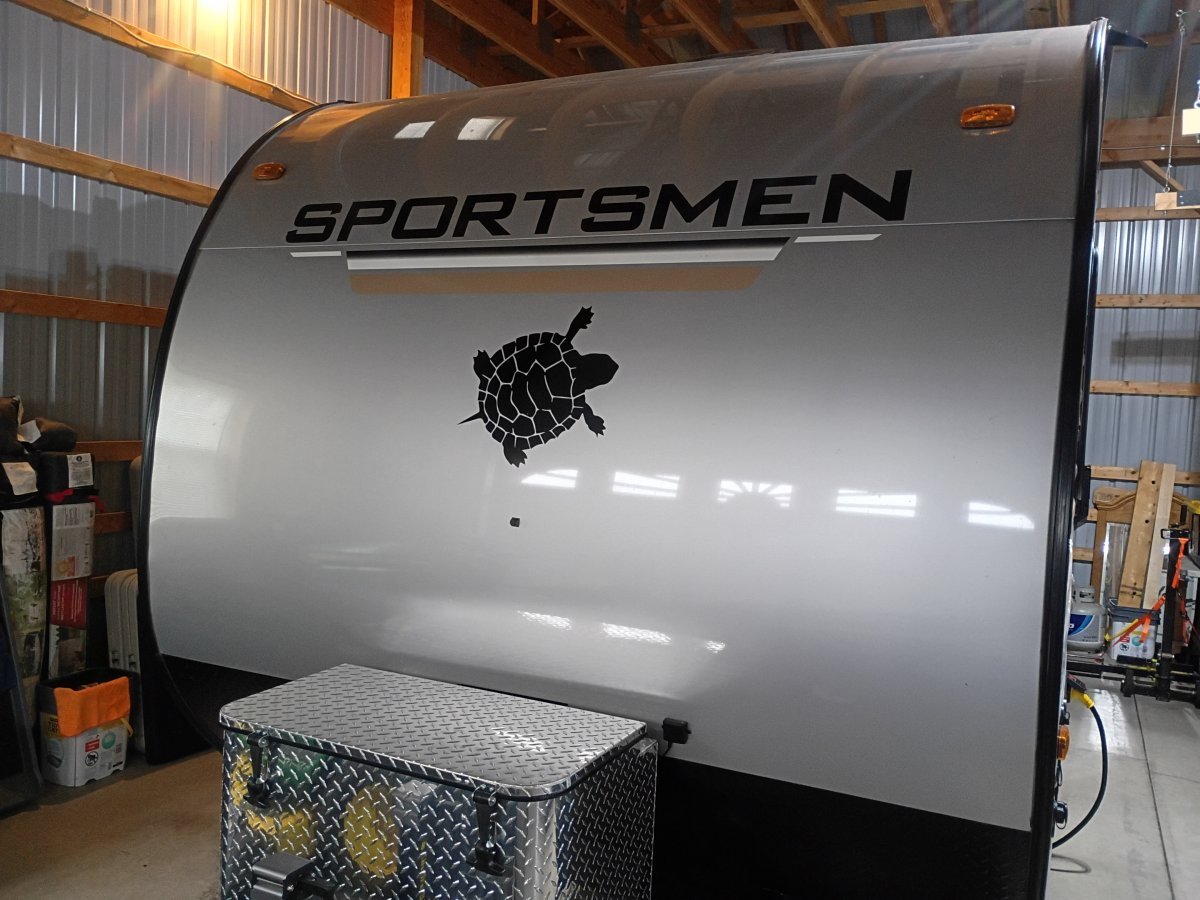
Turtle Graphics
|
|
Decals
Snapping Turtle Graphics added
Large one on the front and small white snapper on the door and the rear bumper.
I order all my custom decals from Finishing Touch Vinyl Art. They are very quick with custom graphics and have a lot of standard off the shelf outdoor decals available.
Check them out: FinishingTouchVinylArt.com
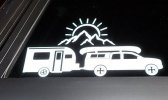
Back window of the truck:
|
Accessories:
Moonshade XL Awning
|
|
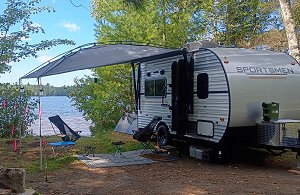
Moonshade XL Awning
When we're camped for more than a day we set our 9'x12' Moonshade XL awning up over the smaller factory awning on our camper.
Just a loop of paracord through the top awning brackets on each side to clip the Moonshade to and let out the factory awing a
couple of inches to snug it up. Don't have to worry about wind and it gives us a lot more shade. Works great.
Larger Picture
Check them out: Moonshade Awnings
|
Foldable RV Step
|
|
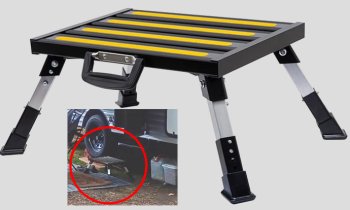
Foldable RV Step Stool
When camping we use this RV step stool. Gives us a stable and larger (12"x16") area step for getting in and out of the camper.
The height is adjustable and it has a slip proof coating. The dogs find it easier also. No need to fold it up as we just set it on the floor at the door when we're towing. We only use the narrow pull out factory step when we're at a rest stop or parking lot.
Foldable RV Step Stool
|
Other things now completed:
- Changed to Goodyear Endurance Tires
- Added a Garmin Back-up Camera (displays on our Garmin GPS)
- Changed ouitside light to red (using Gel Paper over lens) for use at star parties.
Why I chose the KZ Sportsmen 130 RD over others.
More modifications and accessories will be added as I complete them.
| |
|
The content offered here is subject to change without notice and we are not responsible for any mistakes or errors found in the linked pages or the information offered on this web site.
Associate Links - I may earn from Amazon or other link qualifying purchases which help support this web site. These links do not increase the buyer's cost.
Original graphics and content may not be used without permission. All brand names and logos are trademarks of their respective companies.
Copyright © 2026 Steve Johnson, Elbridge NY, All rights reserved.
| |
|

